Halloween Traditions…..

Every October the fellas in my house feel it necessary to repeatedly remind me that I need to make the “traditional Halloween iced pumpkin cookies.”    It simply would not be Halloween without them.

This basic sugar cookie cut out recipe is my go to for most any cut out and iced cookies.  These pumpkin cut out cookies fit perfectly in gift cellophane bags, perfect for your favorite teacher!

Ryan at this very moment my boy is prodding me to get in the kitchen and get the dough going…..gotta go!

Have a great Halloween weekend!

Angie

Ps-why not put a pot of Turkey Chili on the stove so you have something warm and hearty for Halloween night???

Slow Cooked Bolognese Sauce…..

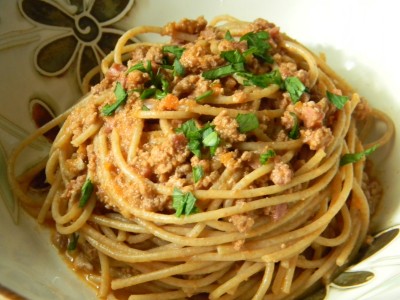
Bolognese sauce is one of my absolute favorite sauces for spaghetti and there is something elegant how it rolls off the tongue, isn’t there?  This takes a bit more cooking time than most of my sauces.   Don’t be turned off by the fact that there are chicken livers in the sauce.  They add a deep and rich flavor and they will literally disintigrate while cooking.  I would recommend doubling or tripling the recipe and freezing the extra sauce to enjoy later.

I used my food processor to finely chop the ham and the vegetables that go into the recipe.  I love the texture of the ground meat and the richness of the sauce.  I subbed out turkey ham for the ham.  Either way, you get amazing flavor from the smoked meat.

When cooking the pasta for the sauce,  under cook it by a couple of minutes.  Reserve 1 cup of pasta water before draining.  Put the pasta back into the cooking pot and add a few ladels of the bolognese sauce with some of the pasta cooking water.  Cook the pasta the rest of the way in the sauce.  That way the pasta will actually absorb the flavor of the sauce.  SO GOOD!  Serve with my simple Garlic Bread aTop with fresh grated parmesan cheese and some

Homemade Bolognese Sauce

2 tablespoons butter
1/2 lb chicken livers, minced
2 tablespoons olive oil
1/4 cup smoked ham, finely chopped
1 cup finely chopped onion
1/4 cup finely chopped carrots
1/2 cup finely chopped celery
2 tablespoons fresh garlic, finely chopped
1 lb. ground beef
1 6 ounce can tomato paste
1 cup red wine
2 cups beef stock
1 cup heavy cream
1 pinch of ground nutmeg
Salt and pepper to taste

1 lb. pasta

1)  Coarsely chop the chicken livers.  Melt the butter in a large sauce pan over medium heat.  Cook the chicken livers for about 5 minutes or until they’re done.
2)  Add the olive oil, ham, onion, carrots and celery.  Cook for about 10 minutes.  Add the garlic, cook for one minute.
3)  Add the ground beef and cook through breaking up large clumps of meat with your mixing spoon.   Add the tomato paste and cook for about 5 minutes, stirring often.
4)  Add the wine and beef stock.  Reduce the heat to low and partially cover with the pot lid.  Simmer for 2 1/2-3 hours, stirring every 15-20 minutes.  Add a little more stock or water if the sauce is too thick.
5)  Add the heavy cream and nutmeg.  Stir well and give it a taste.  Add salt and pepper to your taste.  Serves 6.

I’ve Missed You!!

Oh my gosh!  I’ve been without Internet for five days!  I felt like I was missing a limb!

Anyway,  look for a new post in the next day or so.

Have a great evening!

Angie

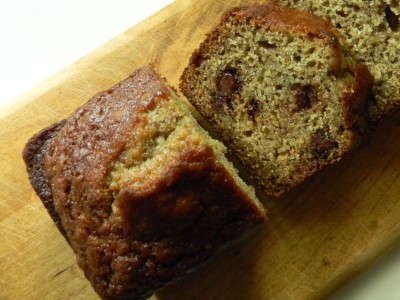
Homemade Banana Chocolate Chip Bread…..

Today is the perfect day for banana bread, don’t you think?  Our lovely sunny and perfect weather is gone.  It’s a bit gloomy outside.  Nothing like a sweet quick bread with chocolate chips to lift our spirits!  This recipe is a very simple one bowl recipe that is consistently delicious.

I always make my quick breads in mini loaf pans.  I do this for three reasons. 1)  They take far less time to bake thus, we’re baking green.  2)  When you bake a quick bread in a large loaf pan they often times dry out due to the very long baking time.  3)  I usually give half of what I bake away as little gifts or pick me ups to my friends.  These are the perfect size to share with someone who might need a little lift.  You can find disposable ones at most any baking isle in the grocery store. I also found them at Bed Bath & Beyond in packages of four for around $10.

What to do with over ripe bananas if you’re not ready to bake?  Don’t throw them away!  Simply remove the peel and put into a zip freezer bag. Remove as much air as possible, seal, and date.  When they thaw they are not the most appetizing fruit but let me tell you, frozen bananas make the BEST banana bread!  I find that when I pulverize the bananas with the other wet ingredients before adding to the dry, you get the best result.  I use an immersion blender but a regular blender will work just fine.

When adding chocolate chips, raisins or nuts to a quick bread, always mix them in with the dry ingredients.  This will prevent the goodies from sinking to the bottom of the bread while baking.  Even chocolate distribution….very important.
Homemade Banana Chocolate Chip Bread

1 1/2 cups ripe bananas (about 3 large bananas)  I’ve made it with four smaller bananas, the measurement doesn’t have to be exact
3 eggs
2/3 cup oil
2 cups all purpose  flour (you can do half whole wheat flour with half all purpose flour if you like)
1 cup sugar
1 teaspoon salt
2 teaspoons baking soda
1 cup chocolate chips, any variety you like, I love milk chocolate chips:-)

1)   Preheat the oven to 350′.  Coat 4 mini loaf pans well with cooking spray.  They should be about 6″x3″.
2)  If you’re using an immersion blender, place the bananas, eggs, and oil into a large mixing bowl.  Blend well with the immersion blender.  If you’re using a regular blender, blend the bananas, eggs, and oil in the blender and pour into a large mixing bowl.
3)  In a medium size bowl, mix the flour through the chocolate chips until well blended.
4)  Add the dry ingredients to the wet ingredients and mix until just blended.  Divide among the prepared pans.  Bake for 30 minutes.  Test with a toothpick if you’re unsure if they’re done.  If it comes out clean, you’re good to go.  Allow them to cool on a rack in the pans for about 10 minutes before removing.  Cool completely.  Wrap with cling wrap or put into a cellophane gift bag and tie with a pretty ribbon.

*This bread freezes brilliantly!

Enjoy!

Angie

Dijon Chicken with Sour Cream Mashed Potatoes….

This chicken is tender and luscious.  I served it with sour cream mashed potatoes which was great with the pan sauce.  Throw in a salad and you have a spectacular dinner!  The best part about it is that it’s so simple. I used legs and thighs as they end up being incredibly moist and succulent.   Prep time takes about 20 minutes then finish in the oven.  I would definitely serve this at a dinner party.

If you’re serving mashed potatoes with this chicken, prep the potatoes into the boiling pot before you start the chicken.

Dijon Chicken

3 lbs. chicken legs and thighs
Salt and pepper
Olive oil, about 2-3 tablespoons
1 large onion, finely chopped
2 large cloves garlic, finely chopped
1 1/2 cups chicken broth or water
2 teaspoons coriander
2 tablespoons dijon mustard
1/4 cup sour cream
1 tablespoon dried tarragon

1)  Preheat the oven to 325′.
2)  Season the legs and thighs with kosher salt and pepper.  Heat a heavy skillet that has a tight fitting lid over medium-high heat.   Brown each seasoned piece of chicken.  Remove from the pan onto a plate.
3)  Add the onion to the pan.  If you have a lot of goodies sticking to the bottom of the pan, add a couple of tablespoons of the broth to deglaze.  Once the onions are soft, add the garlic and cook another minute.  Add the coriander and broth to the pan and add the browned chicken pieces.  Cover with the lid and into the oven for 45 minutes.
4)  Remove the pan from the oven.  Remove the lid (carefully!) and remove the cooked chicken onto a serving platter, cover with foil to keep warm.
5)  Put the pot over medium heat.  Whisk the dijon mustard, sour cream, and tarragon in a small bowl until all ingredients are incorporated.  Whisk into the pan juices.  Cook about a minute.  Pour the sauce over the cooked chicken…Serve immediately.  Makes 6 servings.

Sour Cream Mashed potatoes

2 lbs. russet or yukon gold potatoes, peeled and sliced to 1/4″ inch
2 teaspoons salt
Water to cover
2 tablespoons butter
1/4 cup sour cream
1 cup (or more) milk, zap in the microwave for a minute so that it’s warm

1)  Peel and slice the potatoes and put them into a large pot.  Cover with water and add salt.  Bring to a boil and cook for 20-25 minutes.  Poke a potato with a fork while in the pot to be sure they’re tender.  Drain well and put the potatoes right back into the pot.  Add the butter, sour cream and warm milk.  Cover with the lid and allow to stand for about 5 minutes.
2)  Beat with a hand mixer for about a minute so that it doesn’t have large lumps.  Add additional milk if too thick.  Taste.  Add additional seasoning if necessary.   Cover with the lid until ready to serve with the chicken.  Makes about 6 servings.

Enjoy!

Have a great day!

Angie

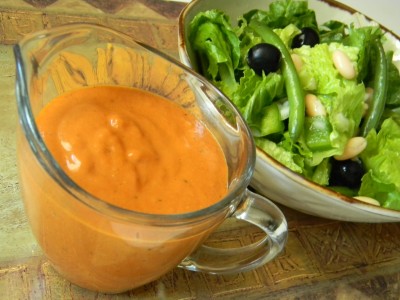
Catalina Salad Dressing…..

This is one of the most delicious salad dressings I’ve ever tasted.   It is a tomato based dressing with a little zip, much like french dressing.  Don’t think you can EVER get something like this out of a bottle!   I enjoyed  it with fresh romaine, onion, blanched green beans, canned black olives (not kalamata) , and cannelli beans.  The dressing seems to compliment this combination very well.  One other addition that would be spectacular would have been crisp bacon, YUM!  You’ll have to roast tomatoes for about 20 minutes, totally worth it!   Other than that everything goes into the blender.  It’ll keep for about 2 weeks in the refrigerator.

Why not serve this salad at your next dinner party?  Your guests will be very impressed!

Catalina Dressing

4 large ripe plum tomatoes, halved
drizzle of olive oil
2 pinches kosher salt
1 pinch of black pepper
1/4 cup red wine vinegar
2 tablespoons tomato paste
1 medium clove of garlic, chopped
1 tablespoon sugar
1/4 teaspoon salt
1/8 teaspoon pepper
2-3 dashes of hot sauce
1/3 cup olive oil

1)  Preheat the oven to 425′.  Halve the tomatoes and toss with a drizzle of olive oil, salt and pepper.  Place in a small baking dish.  Roast tomatoes for about 20 minutes.  Let cool and transfer to a blender.  Add the vinegar through the hot sauce.  Blend.  While blender is going, slowly add the olive oil.  Refrigerate immediately.

*for a little kick add a pinch of cayenne pepper.


Farewell My Tiny Feathered Friends!

Farewell to my beautiful little feathered friends!  It was mid September when I took these shots in my back yard.  They were buzzing around the feeder more than ever getting ready for their long trek south.  I stood outside about 10 yards away from the feeder very still for about 15 minutes with my camera focused on the feeder.  This is the first time I’d ever gotten really good photos of my humming birds.

About a month ago I was at my kitchen sink and noticed a humming bird hovering around my window.  I couldn’t figure out why she’d be there as there are no flowers or feeders there.  Then I noticed a spider web floating in the air and the hummingbird was tugging on it with her long beak.  I know that they use spider webs for building their nests but I’ve never seen anything like that before.  It made me curious why she’d be interested in the web this late in the summer, maybe securing her nest for winter???  Winterizing her nest???

These little creatures bring me so much joy:-)  Safe travels and I’ll have plenty of nectar for you next year!

Angie

Simple Acorn Squash…Only 2 points!

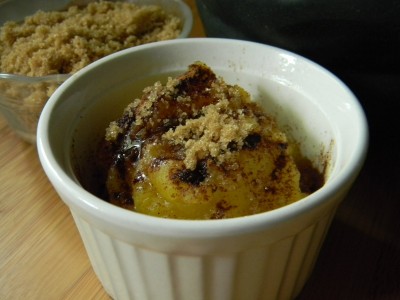
 If you’re like me and have a sweet tooth and are watching your calorie intake, this squash is for you!  So completely satisfying that you will not be scrounging around for a small piece of chocolate or a small cookie after dinner.  The great thing about squash is that it has a zero point value.  It requires few ingredients; a pinch of salt, a little butter, a sprinkle of cinnamon, and a good sprinkle of brown sugar.  Walla…a fantastic dessert like side dish.  Pair it with any roasted or grilled chicken or pork.  YUMMY!

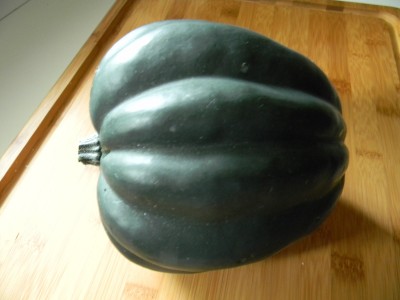
This is acorn squash.  The great thing about it is that it’s easy to cut in half and seed.  It can be cooked in the microwave in about 20 minutes or baked in the oven for 45.  I’ve gotten the best result, of course, in the oven.  When cooking the squash it is important that it becomes very soft.  I find this squash compared to others has the most creamy consistency when cooked to the right doneness.

The way most people enjoy it is right out of the shell.  After it’s baked you add all ingredients right into the squash and put it back in the oven for another 10 minutes to melt the butter and brown sugar.

I think it might be easier to get the kids to try it if it’s removed from the shell…..you know how kids are!  I don’t think my little guy would ask for a try if it were in the shell.  He DID ask me to try it the last time I made it and he LOVED it!  What’s not to love???

Simple Acorn Squash

2 large acorn squash, rinsed well
water
2 pinches kosher salt
4 teaspoons of butter
2 teaspoons cinnamon
8 teaspoons (or more to your taste) brown sugar

1)  Preheat the oven to 350′.  Cut the squash in half and remove the seeds.  Place cut side down on a foil lined cookie sheet.  Add enough water so that there is about 1/8″ in the bottom of the pan, don’t let the water completely evaporate from the pan, add more if needed half way through baking.  Bake for about 45 minutes.  The shell should be completely soft when you (carefully) touch it.
2)  Remove from the oven and with a spatula, carefully turn the squash over.  Cool for at least 10 minutes.  While holding a clean kitchen towel, hold the warm squash in your hand.  Scoop out all of the flesh of the squash into a medium size mixing bowl.
3)  Add the salt and mix the squash well.  Use a hand mixer if you wish.
4)  Place into4 individual serving dishes or into a small casserole dish.  Top with butter.  Sprinkle with cinnamon and brown sugar.
5)  Back into the oven for 5-10 minutes.  Makes about four 1/2 cup servings.

*you can use real maple syrup in lieu of the brown sugar if you like
**If you’d like to microwave the squash to save time, place the squash cut side down on a microwavable dish, add water to 1/8″.  One squash (2 pieces) will take about 10 minutes.  Two squash (four pieces) will take about 20 minutes.  Be sure it is soft.
***Make this squash ahead of time and refrigerate.  Bake for 20-25 minutes.  Would be a GREAT Thanksgiving side dish!

I LOVE FALL!

Although fall is my favorite time of the year, I have a hard time saying goodbye to my lovely deck and all that goes with it…..hummingbirds, butterflies, the night sounds of the crickets and cicadas.   It’s so sad when I walk out onto the deck and it’s completely bare.  Once it becomes completely quiet at night, cold weather is on its way.  I do not hate the cold weather, but it’s a long wait to fill up the deck again.  It is now time for our trees, bushes, and flowers to go to sleep.  It must take a lot of energy to sprout leaves and produce gorgeous flowers.  I will bid them all goodbye soon and look forward to meeting again in the spring.

Now, what to do when the weather turns?  It’s time to cook, of course!   It’s time to try new foods and new cooking techniques.  I think it’s a great idea to pick out a couple of recipes each season and make them to where you’re so confident that you no longer need the recipe.

This past week I made homemade matzo ball soup.  If you’ve ever had matzo balls, you’ll know that the flavors are very basic and simple, almost bland.  I was thinking that I’d love to jazz them up a bit with some nice parmesan cheese and maybe some fresh chopped parsley.  When I mentioned this to my Jewish friend, she very seriously replied “don’t mess with the matzo.”   Matzo not being a family tradition in my house, I think I’d be ok tweaking the recipe, just not for my friend!

Last week I tried Yakitori, a lovely saki marinated chicken kabob with a bokchoy salad, this week matzo ball soup.  Next week?  Maybe not something brand new but something I haven’t made in awhile….maybe shawarma?

Now I just gotta get the camera out when I’m in the kitchen!  My evenings are consumed by hockey practice, swimming and of course, homework.

Have a great evening and keep on cookin’!

Angie

Fried Brown Rice, Only 11Points!

I get very tired of “typical” lunches.  Sandwiches, salads, soup, etc.  Yesterday, I made a killer lunch that took me all of 10 minutes and only cost me 11 Weight Watcher’s points!  I would have taken a picture, but I was hungry…..

I often suggest making a good amount of brown rice whenever you make it so that you have some for later in the week or to put in the freezer.  I did just that this week.  Listed are the ingredients I threw into my fried rice, add whatever you like!  You can easily bulk up your portion by adding extra veggies like red peppers, purple onion, broccoli, pea pods…whatever you have would be great! 

What I had on hand…

1)  canola oil, about one teaspoon
2)  an ounce of grilled chicken or pork, or no meat at all (this would lower the point value, of course!)
3)  frozen peas, 1/4 cup
4)  fresh ginger, 1 teaspoon minced or 1/2 teaspoon dried
5)  scallions, 1/2 cup
6)  an egg, scrambled
7)  cold brown rice, 3/4 cup
8)  low sodium soy sauce, a few shakes
9)  toasted sesame oil, 1/2 teaspoon for flavor

I heated a non stick skillet until very hot and added the canola oil.  Quick fried the chicken until heated through, added the peas, ginger,  and scallions, cooked for about 2 minutes.    I made an opening in the center of the pan and added the beaten egg and cooked it through, mixing and chopping up the cooked egg.  I dumped in the rice and added a drizzle of soy sauce, stirring and turning the rice to heat it through.  Finally, a small drizzle of the sesame oil. 

Healthy, delicious, hot lunch.  Ten minutes.

Always treat yourself as you would your best friend.  You’re SO worth it!

Have a great day!

Angie