Quinoa Stuffed Cabbage Rolls….

040
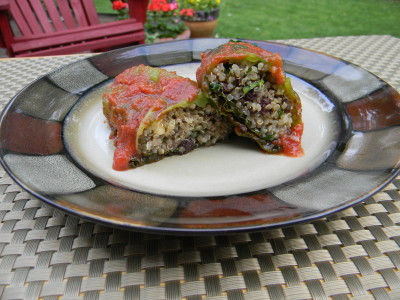
I found a version of this recipe in Eating Well Magazine.  They used brown rice and I thought it might be interesting to use quinoa instead.  I changed it around quite a bit.  I really liked the result.

I made a simple tomato sauce that compliments the quinoa mushroom mixture nicely.

Qunioa Stuffed Cabbage Rolls

2 cups cooked quinoa (1 part quinoa to 2 parts water and a little salt.  Bring to boil, cover and lower heat for about 15 minutes.  Cool)

3 tablespoons olive oil
1 medium onion, finely diced
1/2 lb. white button mushrooms, finely chopped
4 cloves garlic, finely minced or crushed
1/2 teaspoon dried sage
1/2 teaspoon dried rosemary, crushed with your fingers to release flavor
1/2 teaspoon salt
1/4 teaspoon coarsely ground pepper
1/2 cup red wine
1/4 cup dried currants
1/4 cup toasted pine nuts.  Toast in a skillet over low heat, shaking pan often, they burn easily, so watch them closely.  Should take about 5 minutes.

1 head savoy cabbage-slice off about 1″ of the bottom with the core, then carefully carve out the core.

Tomato Sauce

2 tablespoons olive oil
1 small onion, finely diced
2 cloves crushed garlic
1 teaspoon crushed dried oregano
1/2 teaspoon salt
2 pinches black pepper, or more to your taste
2 tablespoons tomato paste
1 64 ounce can of tomato sauce
1 tablespoon sugar, agave or honey
1/2 cup water

1)  Cook and cool quinoa.  Heat a large skillet over medium heat, add olive oil and onion, saute until the onion is soft.  Add mushrooms and cook until the moisture has completely evaporated.  Add garlic, sage, rosemary, salt, pepper and red wine. Simmer until the wine has reduced in half or so.  Cool.
2)  In a large pasta pot, bring water to a boil with 1 teaspoon salt.  Once the water is boiling, add the head of cored and trimmed cabbage.  allow it to cook for 5 minutes.   The leaves will soften, remove the outer leaves with a tongs.  Allow the cabbage to drain well and pat dry with paper towel.  Set aside.
3)  Prepare the sauce.  Saute the onion in the olive oil in a sauce pan, cook until soft.  Add garlic and cook one minute.  Add oregano, salt, pepper, tomato paste and sugar.  Stir often, allow the tomato paste to caramelize, 2-3 minutes.  Add tomato sauce and water.  Preheat the oven to 350′.
4)  Spread a little olive oil over your 9 x 13 baking dish.  Ladle about 1/2 cup of the sauce over the bottom.  It’s time to assemble the cabbage rolls.
5)  Select 8-10 of the largest and prettiest cabbage leaves.  Hold a cabbage leaf in the palm of your hand and fill with about 1/4 cup of the filling.  Carefully roll the cabbage around the filling and place seam side down in the prepared baking dish.   Ladle the remaining sauce over the rolls.
6)  Bake for 35-40 minutes.

Enjoy!

*This recipe can be made 3-4 days ahead and kept in the refrigerator.

Cream Of Carrot Soup….

I would not have tried this soup had it not been for my friend Amy.  She so kindly brought us a batch when Joe got out of the hospital from his recent hip surgery.

Let me tell you, it was fantastic!  When I first tasted it I thought it had to be loaded with cream as it was so rich and delicious.  As it turns out it’s quite healthy!  It would made an awesome afternoon snack as it will only cost you 2 Weight Watcher’s points and would count as one vegetable!  Serve with grilled cheese for a simple and light supper.

If you’ve read any of my previous posts, you know that I encourage you to “tweek” my recipes and make them your own. After eating this amazing soup, of course, I started thinking of different variations.  How about half carrots and half parsnips?  How about sweet potatoes?  The possibilities are endless!

The ingredient list is very simple.  You will need to blend the soup in a blender for the best smooth consistency.  Only fill your blender 3/4 full before blending as you can have a “hot” mess in your kitchen if you fill it too high.  I would also recommend holding a clean kitchen towel over the top of the blender while the blender is on.

Cream of Carrot Soup

2 lbs. peeled carrots, cut into 3/4″ pieces *about 6 cups)
4 tablespoons butter
1/2 lb.  chopped yellow onions, about 1 3/4 cups
4 cups chicken broth or vegetable broth
2 cups 2% milk
1/4 teaspoon cayenne pepper

1)  Peel and cut carrots into 3/4″ pieces.
2)  Melt butter over medium heat in a large soup pot and add onions.  Cook until soft, about 7-8 minutes, stir often.
3)  Add carrots, broth and salt to taste.  I added about 1 teaspoon of kosher salt.  Turn up the heat and bring to a boil.  Once it’s boiling, reduce heat to medium again and simmer until the carrots are soft, about 20-30 minutes.  Remove from heat and add milk and cayenne.
4)  Process in blender ins small batches.  Serve hot or very cold.

*Refrigerate left overs.  Makes about 12 one cup servings.  Freezes beautifully.

Have a wonderful day!

Angie

Sauteed Cabbage….

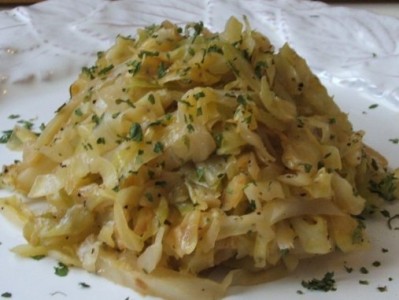
This is actually my favorite part of  St. Patty’s Day dinner.  When this vegetable is caramelized, it becomes sweet and so flavorful.  You must try this!  It takes a little time to cook as it takes about 40 minutes, but it will be well worth it.  You also must stir often as the sugars in the cabbage can burn.  It can be made ahead if you like.

If you have any leftovers, try tossing the caramelized cabbage with hot linguine and some fresh grated parmesan cheese for a fantastic vegetarian meal!

Sauteed Cabbage

Slice the cabbage into quarters and remove the core.  Thinly slice the entire head.    In a heavy large skillet over medium heat, melt 1 tablespoon of butter and add 2 tablespoons of olive oil.  Add the cabbage.  Season with kosher salt and pepper.  Cook for 40-50 minutes over medium-low heat, stirring often,  until the cabbage is caramelized.

YUM!

Have a great day!

Angie

Best Irish Soda Bread Recipes…..

I especially love St. Patrick’s Day because it was about the time I met my husband Joe.   We went to a St. Patty’s Day Party on our first date.  It was then that I knew I wanted to marry him.  Warm fuzzies:-)

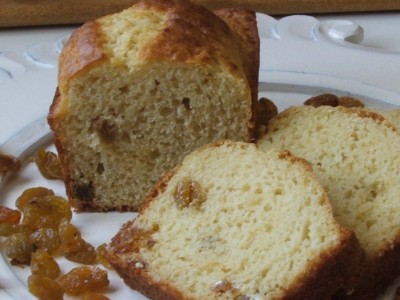
I love the traditional St. Patrick’s Day dinner.  So easy to make and so good.  Of course, you must serve Irish Soda Bread.  I make this bread often throughout the year as it goes great with any hearty soup or stew.

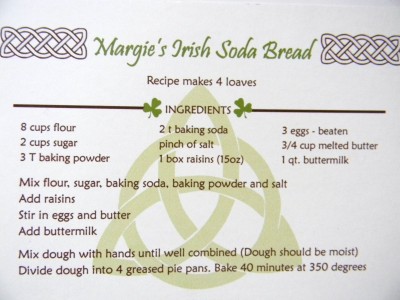
There are many, many Irish Soda Recipes out there but the latest one I tried was at my sister-in-law’s mother’s funeral.  I thought what?  A table of Irish Soda Bread at a funeral?  Of course, this was brilliant!  She was known for her delicious soda bread.  It was so sweet, they had shamrock decorated table with offering slices of bread, wrapped bread to take home and her recipe printed on a pretty recipe card.  What a beautiful idea!

I LOVED her recipe.  It was a little sweeter than mine and had an amazing buttery taste.  I will be making her recipe this St. Patrick’s Day.

One of the things that I love most about cooking are cherished traditional family recipes.   Whatever you do, if you have a special recipe from your Mom or Grandma or any family member, make them and share them with your kids.  Dear Margie will live on through her fabulous recipe.  Here it is.

Love the simplicity of the recipe.  You can tell that she made it over and over again so her recipe did not need tons of direction.

The recipe is large.  I am thinking the four pans used for baking would be 8-9″ round.    You could also make half of the batch in mini loaf pans, filling them a little over half full.  Baking time would be about 30 minutes at 350′.   This bread would make amazing french toast!!

Have a wonderful day!

Angie

Toasted Barley Risotto With Fennel and Asparagus….

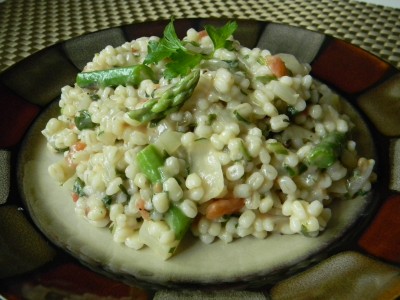
This dish is really, really good.  I totally LOVED it!   Although I am using barley in lieu of arborio rice, this grain has plenty of starch that will give you the same creamy result as the rice version.  Enjoy as a vegetarian main or as a delicious side.  Add any vegetable combination  you like.  I think it would be really good with re-hydrated porcini mushrooms and peas.  Toasting the barley gives the dish a nutty flavor and keeps it from getting mushy when cooking.  Unlike regular risotto, this rewarms beautifully.  If you want to make it ahead, I think it best not to add the blanched asparagus to the barley until you’re ready to serve.  Adding just before serving will keep it bright green and appetizing.

When cooking risotto, it is difficult to give an exact liquid measure.  You must watch it closely and stir if often.  When you notice that most of the cooking liquid has been absorbed, add more.  When you get close to 45 minutes of cooking time, taste it before adding more liquid.  It should be creamy and the barley should be tender yet  slightly firm to bite.  You may have to add additional liquid.

Another important note on risotto.  When adding liquid to the pot, you’ll want to add hot liquid.  You can have stock on the stove over low heat or zap in the microwave.  Adding cold liquid would prolong cooking time.

Toasted Barley Risotto with Fennel and Asparagus

1/2 lb. asparagus, trimmed and cut into 3/4″ pieces

1 cup barley
1 1/2 tablespoons butter
1/2 cup chopped onion
1 cup chopped fennel, the bulb portion (about 1 medium bulb)
2 large cloves garlic, minced
5 cups chicken or vegetable broth
1 14 oz. can petite diced tomatoes, with juice
1/2 cup freshly grated parmesan cheese
1 cup chopped arugula or spinach
1/4 cup fresh parsley
Salt and pepper to taste
1 tablespoon lemon juice, fresh or bottled

1)  Cook the asparagus in a pot of boiling, salted water for about 3 minutes.  Drain and immediately plunge the drained asparagus into ice water to stop the cooking.  Drain well.  Can be made 1 day ahead.  Cover and refrigerate.
2)  Put the stock into the microwave to heat or heat in a small pot on the stove.  In a large cooking pot over medium heat add the barley and heat until lightly toasted stirring often.  About 5-7 minutes.  Transfer barley to a bowl and return the pot to the stove.  Add the butter and melt.  Add the onion, fennel and garlic, cook until tender, about 5 minutes.  Add the barley to the pot, stir to coat.
3)  Add 2 cups of the stock to the pot and reduce the heat to low.  Simmer until most of the liquid is absorbed, stirring often, about 7 minutes.  Add the rest of the stock to the pot.  Continue to stir often.  When most of the liquid is absorbed, add the canned tomatoes with the juice.  Allow the tomato juices to be absorbed.  Taste to check the doneness of the barley.  It should be creamy and the barley should be tender but still be a little chewy.  If you feel it’s too chewy, add a little more liquid and allow this liquid to absorb and taste again.  Once it’s to the right texture, add the parmesan cheese,  arugula (or spinach) and parsley.  Stir until the arugula is wilted.  Taste.  Season with salt and pepper.    Stir in the asparagus and the lemon juice.  Serve with additional parmesan cheese.  Makes 4 servings.

Enjoy!

Angie

Frozen Artichoke Tip and Artichoke and Fennel Salad…..

I’ve fallen in love with Trader Joe’s frozen artichokes.  I love that you only pay for artichokes and not the packing liquid as you do with the canned.

The first time I used them I tossed them with olive oil, lemon juice, garlic and salt & pepper.  I roasted them (when my oven was working!) at 375′ for about 20 minutes.  Delish!  The key ingredient here in terms of the brightness of the artichoke was the addition of the lemon (or acid.)   You do not have this issue with the canned artichokes because they add citric acid to the canning liquid. 

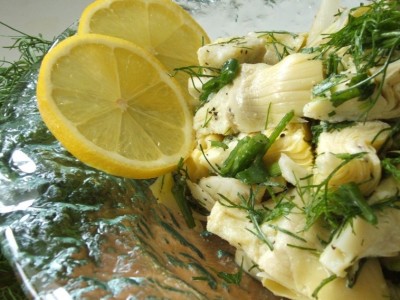
This spring like artichoke and fennel salad is really good alongside any fish or chicken dish.   Of course, I used the frozen artichokes in my salad.  When I steamed them in water and a little salt, they came out very gray.  Interestingly, I tossed them with the lemon dressing and poof, they returned to a more appetizing state.   Clearly acid is required in the cooking process which I found interesting that directions on the package did not mention this.

Steamed Frozen Artichokes

Rinse and drain a 12 ounce package of frozen artichokes.  Put into a pot with 1 tablespoon lemon juice and 3 tablespoons of water.  Steam covered over low heat until most of the water has evaporated, about 6-8 minutes.  Drain well and cool if you’re using in the above salad.   Great in any salad or pasta.  Roast with chicken or add to soups.   The possiblities are endless!

Artichoke and Fennel Salad with Lemon Dressing

2 fresh fennel bulbs with fronds
2 cans quartered artichokes, drained or two packages frozen, steamed, rinsed and cooled
3 tablespoons parsley, washed and chopped
3 green onions, rinsed and thinly sliced
3 tablespoons olive oil
2 tablespoons fresh or bottled lemon juice
2 cloves fresh garlic, crushed
½ teaspoon salt
¼ teaspoon pepper

1) Rinse thoroughly.  Trim off the bottom of the bulb and leave about 1″ of the fronds, slice thinly, place in a large bowl. Remove the tender frawns, the deep green portion, and chop coarsely. (Do not use the celery looking stalks, they are very tough, they would be great in soup.) Add parsley and green onions.
2) In a small bowl, whisk the olive oil through the pepper. Pour over vegetables and toss gently. Taste, add additional salt and pepper if necessary.

Have a great day!

Angie

Polenta Squares With Fontina Cheese…..

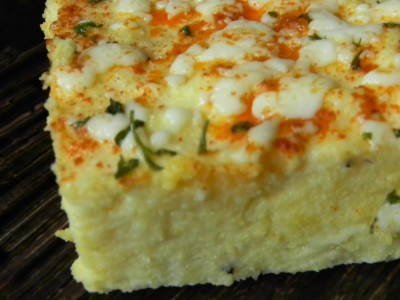
Polenta is an amazing neutral grain that you can easily tailor to your own taste.  I love it because it’s naturally creamy and sets up perfectly when refrigerated.  It can be cut into squares, triangles, or circles.  It can be pan fried, deep fried, grilled or baked.  (I feel like Bubba in the movie Forest Gump talking about all the things you can do with shrimp!)  I added fontina cheese to the hot polenta and topped it with additional cheese.  For a little color, I did a light sprinkling of sweet paprika and dried parsley.  You could add any cheese you like.  I think it would be amazing with a sharp bleu cheese and of course, reggiano parmigiano.

It can be served a couple of different ways.  You can serve it in its creamy state, right out of the pot.  You could put a spoonful right onto your plate or into a large soup bowl and top it with a thick marinara or meat tomato sauce.  Top with additional cheese and you have dinner.  I prefer it chilled in a 9×13″ pan, then baked and cut into squares.  This method is great for entertaining because all you have to do is pop it in the oven for 35 minutes or so and serve.

Enjoy as a vegetarian main dish with an arugula salad with a tangy vinaigrette.  Serve with most any rich, braised meat, grilled chicken or fish.    I served it with braciole.  The rich tomato and garlic sauce paired beautifully with the creamy polenta.

Polenta Squares

8 cups water
1 teaspoon salt
2 cups cornmeal
1/4 cup half and half
2 tablespoons butter
1 1/2 cup cheese
1/2 teaspoon sweet paprika
1 tablespoon dried parsley

1)  Butter or coat a 9 x 13″ baking dish with cooking spray.
2)  In a large pot bring the water and salt to a boil.  Lower the heat so that it’s just simmering.
3)  With a whisk, slowly add the cornmeal to the pot, whisking quickly (and carefully)  to avoid lumps.  Once you get all of the cornmeal into the pot, you will notice it’s extremely thick.  Remove it from the heat immediately as the bubbling liquid can bubble right out of the pot and burn you!
4)  Immediately add the half and half and butter.  Whisk to combine.
5)  Add 1 cup of the cheese, stir gently to blend.  Pour into prepared pan.  Top with the remaining 1/2 cup of cheese.
Refrigerate until firm.
6)  Preheat the oven to 350′.  Bake for 30-40 minutes or until completely heated through.  Sprinkle with the paprika and dried parsley.  Cut into squares.  Makes 12 3″ squares.  Serve 2 per person.  Serves 6 total.

Enjoy!

Angie

*For grilling or pan frying,  skip topping the cooked polenta with the extra 1/2 cup of cheese until after grilling.   Cut it into squares while it’s chilled and grill or pan fry.  Grilling can be tricky because it softens up again after heating.  The grill needs to be extremely hot and you’d want to coat it lightly with vegetable oil.  For pan frying, be sure the pan and oil are extremely hot so that it browns the polenta.  Flip very carefully.

Veggie Grilled Cheese or Panini…..

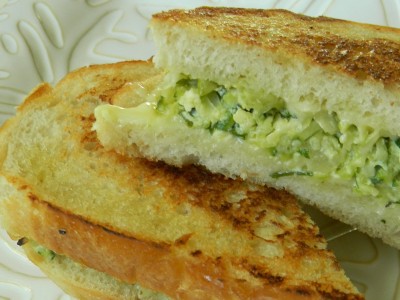
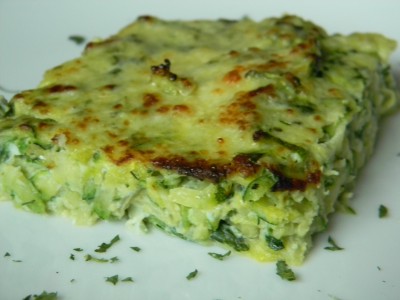
Here’s a quick and really tasty way to use up your zucchini bake.  Warm a slice of zucchini bake large enough to cover a slice of sourdough bread and warm it in the microwave until very hot.  Heat a skillet over medium heat.  Brush the two pieces of sourdough bread lightly with olive oil.  Make a sandwich using your favorite cheese, I used gruyere swiss, then the warmed zucchini bake.  Toast until the bread is nicely browned.  Walla, a quick and easy lunch or dinner.  Enjoy with Tomato Basil Soup, delish!

I think some roasted red pepper would be a pretty fabulous addition to this sandwich as well.  It’s the perfect opportunity to get creative.  That’s why I love to cook, the possibilities are endless!

Have a great evening!

Angie

Veggie Lasagna Rolls…..

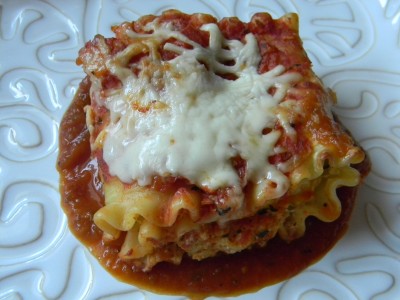
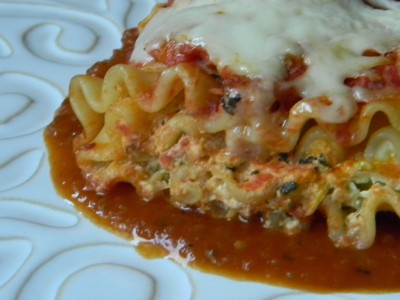
I am delighted to share my latest healthy vegetarian recipe!  Why not make ahead for your next dinner party?  Simply pop them into the oven about an hour before you want to serve.  Serve with a nice salad my simple garlic bread.  So good.
The recipe is large, it makes 16 rolls.  One roll will only cost you 5 Weight Watcher’s points, so worth it!  Freeze leftovers for another time or enjoy for lunches during the week.  You will need a batch of marinara sauce or you can use your favorite bottled sauce.

Veggie Lasagna Rolls

1 package lasagna noodles (14-16 pieces)
2 tablespoons olive oil
1 medium onion, finely diced
1 medium red bell pepper, finely diced
1 medium zucchini, trimmed and grated
1 medium yellow squash, trimmed and grated
3 large cloves garlic, minced
1 teaspoon dried oregano
1/2 teaspoon dried basil
16 ounces part skim ricotta cheese
1 egg
3-4 cups marinara sauce or your favorite bottled sauce
4 ounces mozzarella cheese

1)  Boil the lasagna noodles according to the package directions, undercooking by 2 minutes.  Drain and rinse.  Carefully lay them out flat until it’s time to use them.  Refrigerate if you’re going to use them later.
2)  Place a large skillet over medium-high heat and add the chopped onion and red pepper.  Cook for 5-6 minutes.  Add the garlic and cook another minute.  Add the shredded zucchini and the yellow squash.  Cook for 10-15 minutes, stirring often.  Pour into a large bowl to cool.
3)  Once the veggie mixture is cool, add the ricotta cheese and the egg.  Mix well to combine.
4)  Preheat the oven to 350′.  Coat a large baking dish with cooking spray.  (You may need an additional dish)  Spread about 1 cup of the marinara sauce over the bottom of the pan.
5)  At one end of the lasagna noodle, place about 1/3 cup of the veggie/cheese mixture and carefully roll the noodle completely around the filling.  Place in the baking dish seam side down.  Stuff the rest of the noodles.  Pour additional sauce over the rolled and stuffed noodles.  Top with mozzarella cheese.
6)  Bake for 40-45 minutes.  Makes 16 rolls.

*Extend the baking time by 10-15 minutes if you make them ahead and they’re cold.
**freezes beautifully.
***Use any vegetables you like.  If you use mushrooms, be sure to cook the moisture out of them.


Have a healthy day!

Angie

Zucchini Bake…..

I get bored with vegetables at this time of year.  It can be challenging to come up with different things to do with vegetables that don’t involve a lot of added fat.

I love this dish.  It is actually better the next day.  Make a good amount of it so you can enjoy for lunches during the week.  Serve with simply roasted chicken or fish.

Zucchini Bake

2 lbs. zucchini trimmed and grated by hand or with a food processor
1/2 teaspoon kosher salt plus additional to taste
1 tablespoon olive oil
1 large onion, finely chopped
2 large cloves garlic, minced
2 tablespoons chopped fresh parsley or 1 tablespoon dried
1 teaspoon dried basil
1/2 teaspoon black pepper
2 eggs, beaten
1/3 cup grated parmesan cheese

1)   Grate the zucchini and place int a colander.  Sprinkle with 1/2 teaspoon salt and allow to drain for 10 minutes.  Squeeze any excess moisture out of the zucchini.
2)  Coat a 9 x 13″ baking dish with cooking spray.   Preheat the oven to 350′.
3)   Add the olive oil to a large skillet and place over medium-high heat.  Once the pan is hot, add chopped onion.  Cook for 7-8 minutes or until onions are translucent.  Add the garlic and cook another minute.  Add the drained zucchini.  Cook for 4-5 minutes.  Add the parsley, basil and pepper.  Taste the mixture.  Add additional salt to your taste if necessary.
4)  Pour the zucchini mixture into the prepared baking dish.  Pour the beaten eggs over the zucchini.  Mix well and smooth out the top.  Sprinkle the top with parmesan cheese.  Bake for 25-30 minutes.  Serve hot or cold.  Cut into squares.  Makes about 12- 3″ squares.  Serves 6.

Enjoy!

Angie