“UFOs”…..unidentified “food” objects….

There are two categories of squash, summer and winter.  Summer squashes are available year round and the outer skins are edible.  Winter squashes have the name because of late summer and early fall harvesting.  They will last for most of the winter and their tough skins are not edible.

The pictured “UFO” is spaghetti squash.  It is shaped like a small oblong watermelon and the average weight is between 2 and 5 lbs.  You will want to pick the most yellow you can find, it will be the most ripe and ready to eat.

I love using this unusual vegetable.  It is a nice alternative to wheat pastas.   It has a very mild taste so I like to use lots of onions and garlic for flavor.  I love the addition of sun dried tomatoes, they add a nice layer of flavor and color as well.   Serve this recipe as a delicious side to most any roasted meat or enjoy for lunch the next day.

Spaghetti Squash with Sun Dried Tomatoes & Garlic

1 medium size spaghetti squash, halved and seeded
1 cup water
2 tablespoons olive oil
1 medium onion, diced
3 tablespoons chopped parsley
3 large cloves garlic, peeled and minced
¼ cup chopped sun dried tomatoes
¼ teaspoon red pepper flakes (optional)
½ teaspoon salt

1)  Preheat oven to 350’.
2)  Carefully cut squash in half lengthwise.  Using a large spoon, scoop out seeds & discard.  Place halved squash cut side down on a foil lined cookie sheet with sides.  Place in oven and pour water into pan.
3)  Bake for 45 minutes, the squash should be soft to the touch.  Remove from oven and place on a cooling rack.  Carefully flip squash over and allow to cool enough to handle.  Using a fork, remove spaghetti like flesh from outer shell and place into a medium size bowl, set aside.
4) Heat a medium size non stick pan or cast iron skillet over medium heat. Add olive oil to pan, add onions; cook until translucent. Add garlic and sun dried tomatoes; sauté one minute. Add cooked squash; heat through. Add parsley and mix well. Season with salt & pepper. Taste, adjust seasoning if necessary.

Parsley Pesto with Whole Wheat Pasta

This is a very pretty and delicious side dish.  You can serve it warm or at room temperature.  I love to serve this with the parmesan encrusted chicken.

1 large bunch fresh parsley, rinsed and drained
2 cloves fresh garlic
1 tablespoon lemon juice
2-3 tablespoons olive oil
¼ cup toasted walnuts
½ cup grated parmesan cheese
½ teaspoon salt
¼ teaspoon pepper
1 ½ cups frozen petite peas, thawed
1 lb. cooked whole wheat pasta, reserve 1 cup pasta water

Place parsley through pepper into a food processor and pulse until all ingredients are combined.

Cook pasta aldente`.  Drain & put back into pot.  Add pesto, pasta water, & peas; stir until pasta is thoroughly coated.  Add additional cheese to taste.  Serve warm or at room temperature.

To toast walnuts:  Preheat oven to 275’, spread walnuts over cookie sheet & toast for 15 minutes.

Parmesan Encrusted Chicken

Make this for dinner and it will be in the regular meal rotation in your house.  Oven baked and crispy like fried chicken or chicken strips, your family will absolutely flip!  Make with chicken tenders or cut the chicken breasts into strips.
Parmesan Encrusted Chicken

1 ½ lbs. boneless, skinless chicken breasts, trimmed (you can also use chicken tenders, or boneless thighs)
1 cup plain dried bread crumbs
¾ cup grated parmesan cheese
1 cup flour
2 eggs
2 tablespoons water
Salt & pepper

1) Preheat oven to 400’. Line a cookie sheet with Reynolds non stick foil.
2) You will need three containers for coating the chicken. Into the first, mix the bread crumbs and parmesan cheese, set aside.
3) Second, beat the eggs and water, set aside.
4) Third, the flour.
5) Trim your chicken of any excess fat. Season generously with salt & pepper.
6) In this order, coat the chicken: First in flour, then the egg mixture, and finally the bread crumbs. Be sure you have evenly coated each piece.
7) Drizzle a small amount of olive oil over the foil lined sheet & place breaded chicken on sheet. Lastly drizzle a bit more oil over chicken. Bake for 30-40 minutes or until golden brown and crispy.

Serve with a Simple Garlic and Cheese Pasta and a simple salad. YUM!

Note: If the chicken breasts are very large, you can slice horizontally, carefully holding the top of the breast with your hand and slicing through the center. You must use a very sharp knife, and be careful. You now have “cutlets,” they will take less time to bake.

Enjoy!
Angie

Egg & Sausage Breakfast Bake

Hello!  I’d like to share one of my favorite “make ahead” recipes for Christmas morning.  You can add any ingredient you like.  Simply put it together the night before & when you get up, before you open presents, put it in the oven.  It takes 45 minutes to bake and after only about 20 minutes you start to smell the aroma of breakfast, yum!  It’s also nice to serve some sort of bread, try the blueberry streusel, it’s very good and you can make it a couple of days ahead and freeze.  I defrost in the microwave for 2 minutes and it’s ready to go!  Stress free and delicious breakfast, so easy.

1 lb. sausage, cooked and drained (any kind you like, you could also use cooked and crumbled bacon or no meat at all)
Vegetables-any you like, cook them first, otherwise there would be too much moisture.  Mushrooms, onions, peppers, tomatoes, any one or all of these would be great!
1 1/2 cups shredded cheddar cheese
1 1/2 cups milk
6 slices of whole wheat bread, cubed
2 teaspoons dried mustard
6 eggs, beaten

Evenly coat a large casserole dish or a 9 x 13″ pan with cooking spray.  Add cubed bread.  Cook and drain sausage, add evenly over bread.  (if you want to add any vegetables, cook and add them now) Beat the rest of the  ingredients in a mixing bowl and pour over bread and sausage.  Cover and chill overnight.  Place in cold oven and set temperature to 350′, bake for 45 minutes.  Serve immediately.

Blueberry Streusel Bread

3 cups all purpose flour
1 cup whole wheat flour
1 cup sugar
8 teaspoons baking powder
1 ½ teaspoons salt
1 ½ cups fresh or frozen blueberries
2 eggs, slightly beaten
2 cups milk
½ cup canola oil

Streusel topping:

1 cup sugar
½ cup flour
5 tablespoons butter, softened
2 teaspoons cinnamon

1)  Pre heat oven to 350’.  Evenly coat 7 mini loaf pans with cooking spray, set aside.
2)  In a small bowl, combine all streusel ingredients with your hands until you have a nice crumbly mixture.  Set aside.
3)  In a large mixing bowl, combine first 5 ingredients, mix well, add blueberries, gently stir to coat, make a well in center.
4)  Add wet ingredients into well, stir until just combined.
5)  Add a large spoonful of batter into each pan, top with a small amount of streusel, add more batter to fill pan to 2/3 full.  Top each loaf evenly with remaining topping.
6)  Bake for 30-33 minutes.  Test with a toothpick for doneness.
7)  Remove from oven and allow to cool for 10-15 minutes, then carefully remove from pans and allow to cool completely on rack.  Package in cellophane bags or wrap in saran.  Freeze if you will not be using immediately.

Coconut Macaroon Cookies Dipped in Chocolate

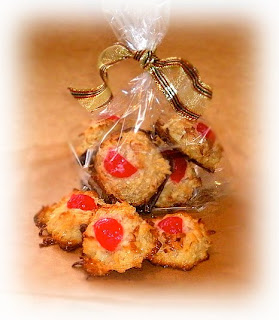
I love this recipe, it’s beautiful and festive and doesn’t involve that much time for decorating.  Dipping them in chocolate is optional, I perefer them with chocolate, of course!  I also love that the ingredient list is so short, you just mix the first three ingredients together, top with a cherry, & bake. 

I also love to package my cookies in a small goodie bag, I usually put 1/2 dozen in each bag and tie with a pretty ribbon.  These make the most beautiful gifts, and I feel like I’m sharing a small piece of my heart!  Merry Christmas!

Recpie:

1 14 oz. package sweetened flaked coconut
3 tablespoons flour
1 14 oz. can sweetened condensed milk
1 jar of maraschino cherries, halved
1 ½ cup semi sweet chocolate chips (optional)

1)  Preheat oven to 350’.  Line your cookie sheet with parchment paper-very important!
2)  Empty bag of coconut into a large mixing bowl.  Measure flour into coconut and toss to coat.
3)  Add vanilla and pour condensed milk over coconut mixture.  Mix well.
4)  Using a 1 ½ teaspoon cookie scoop, portion out onto parchment paper, being sure to level off when scooping to make for evenly sized cookies.  There is no levening in this cookie, so you can place them pretty close together on your sheet.
5)  Top cookie with maraschino cherry, I cut them into pieces if they’re too large.
6)  Bake for 20 minutes.  Remove from oven, slide entire sheet of cookies off of baking sheet onto cooling rack.  Cool completely.
7)  Pour chocolate chips in a microwaveable glass dish, shallow enough to dip the bottoms of your cookies into.  Microwave in 30 second increments, stirring between, do not over heat chocolate, it will burn!  You want to stir until smooth and all chips seem to be melted.  It does not have to be hot.
8)  Carefully dip each cookie bottom into the chocolate and place right back onto your parchment paper.  Allow to set up.  To move the process along, you can place the entire sheet in your refrigerator.  When they’re set you’re good!  They can be packaged or put onto a tray without mess.

Enjoy!

Santa Thumbprint Cookies

Ahhhhh, a butter cookie topped with some delicous raspberry preserves, what’s not to love?  I love this simple, old fashioned cookie. 

1 cup softened unsalted butter
¼ cup sugar
1 teaspoon vanilla
2 cups sifted flour
½ teaspoon salt
1 cup finely chopped nuts
¾ cup raspberry jam, or your favorite

1)  Preheat oven to 400’.  Cut a sheet of parchment paper to cover your cookie sheet.
2)  In a large mixing bowl or stand mixer, cream butter, vanilla & sugar until light & fluffy.
3)  Combine flour and salt; add to butter mixture and blend well.
4)  Place nuts into a small bowl.  Shape dough into 1” balls and roll in nuts to coat.  Place on cookie sheet and press a divot with your thumb into the center of each cookie.
5)  Bake for 10-12 minutes.  Remove from heat and carefully slide the parchment with the hot cookies onto your cooling rack.
6)  Using a small spoon, carefully spoon about ½ teaspoon of jam into centers.  Cool completely.  I like to let these cookies sit out overnight for the jam to set.  Store in an air tight plastic container being careful not to disturb centers.

"People Cookies"

Hello everyone!  These are actually Gingerbread Cookies, however, since Ryan could talk, he has called them “People Cookies.”  I think it’s the most appropriate name for them as no one of them looks the same, they all seem to have their own personalities.  Try to bake them when your family is home, the aroma is amazing, I believe companies have tried to make candles with this scent!  Involve your kids in the decorating, they will LOVE it!  I do the piping and my boys place the raisin eyes and cinnamon buttons on each cookie.  They also are more than willing to taste, you know, to be sure they’re good….

You will want to be sure to refrigerate the dough at least an hour before you roll it out.  I like to make the dough a day or two ahead of time, then bake.  When you do this, the dough gets pretty hard.  You have to let it sit out at room temperature for at least an hour.  I start out by cutting off about a 4″ chunk and I work it with my hands until I’m able to put it onto a floured board and roll it out.  From that point on you just keep adding new dough to the scraps on the counter, kneading it together to form a pliable dough you can roll out.  Also, when measuring the flour, be sure you sift the flour to be sure that you aren’t using too much, the dough will be too dry with too much flour and will make it hard to roll out. If this is the case, simply add a little water, kneading to get it to a rolling out consistency.

When baking, I line my cookie sheets with parchment paper.  This makes for non stick baking, as well as easy removal right out of the oven onto a cooling rack.  The cookies will cool faster on the rack on  parchment than on the pan.  In addition, wait until they’re mostly cool before you remove them to give them a chance to set up.

Decorating takes practice.  I use an icing that I pipe onto the cookie, I use a Wilton 12″ featherweight decorating bag with tip #5.  You can find these at most any craft store, I got mine from a Michael’s and I think JoAnn Fabrics & Crafts carry them too.  After decorating, I let them sit out, uncovered over night for the icing to set up.  I then carefully package them. You can use royal icing as well, however, it gets extremely hard and I don’t like the taste as much.

Here is the recipe.  Enjoy!

Gingerbread Boys and/or Girls

1 cup butter
1 1/2 cup sugar
1 egg
2 tablespoons molasses
3 cups sifted flour
2 teaspoons baking soda
2 teaspoons cinnamon
1 teaspoon ground ginger
1/2 teaspoon ground cloves
1/2 teaspoon salt
Dark raisins
Cinnamon candy for buttons or gumdrops

1)Cream butter and sugar together in  large mixing bowl or stand mixer. 
2)Add egg, beat until light & fluffy. 
3)Add molasses, mix well. 
4)Sift dry ingredients & mix into creamed mixture a small amount at a time.  Knead into a ball, cover with saran wrap & chill.
5)Preheat oven to 375′.
6)Roll out to 1/4″ on a lightly floured board.  Cut with gingerbread boy/girl shapes. 
7)Bake for 8-10 minutes.  Watch carefully, smaller cookies may take 8 minutes while a very large cookie may take 10-11 minutes.  It is good to remove them from the oven when they’re slightly brown and puffed up.  When they cool, they settle into a flat cookie.  You will have a crunch exterior and a soft interior, YUM!

Icing

4 cups powdered sugar
4 tablespoons softened butter
1 teaspoon vanilla
3 tablespoons water

Beat in a medium size bowl butter and vanilla.  Add powdered sugar and add water, a tablespoon at a time.  You may have to add a small amount more for the right consistency for piping.  You do not want too much water as the icing will run down the sides of the cookie.

My little boy absolutely loves these cookies.  I hope you and your family have as much fun as we do making, decorating, and eating them!  Have fun!  Email me if you have any questions!

Angie

Shrimp Cocktail

RECIPE:
1- 2 lb. package frozen cooked & peeled shrimp

1 cup ketchup
3 tablespoons prepared horseradish
2 tablespoons brown sugar

To thaw shrimp, place into a large bowl in sink and allow water to slowly run into bowl, stir frequently.  Drain well.

Sauce:
Mix well, refrigerate.  Serve with cooked & peeled shrimp.  Garnish with fresh parsley and fresh lemon wedges or slices.