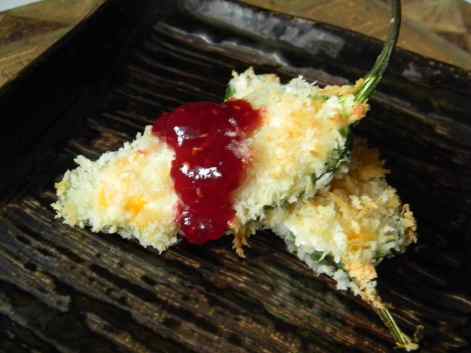
Three Cheese Stuffed Jalapeno Peppers….

This is the perfect combination of sweet and spicy.  Like most people, I love fried foods but avoid them.  Try these, you will not know the difference!  Remove the seeds and membrane and you should eliminate most of the heat.  Leave a bit in if you want a little more “kick.”  The sauce is super simple, raspberry preserves cut with a little rice wine vineagar…YUM!

Oven Fried Three Cheese Stuffed Jalapeño Peppers

18 jalapeno peppers, blanched, halved, and seeded

Kosher salt

8 oz. cream cheese, softened

1 ½ cups shredded extra sharp cheddar cheese

4 ounces goat cheese

¼ cup piquillo peppers, minced or any sweet red pepper

2 teaspoons Worcestershire sauce

2 eggs, beaten

1 tablespoon water

2 cups panko bread crumbs(Japanese Bread Crumbs)

Sweet and sour sauce

1 cup raspberry preserves

1 tablespoon rice wine vinegar

1)  Bring a large pot of water to boil over high heat.  Add 1 teaspoon salt.  Once boiling, add whole peppers to pot and boil for 2 minutes.  Drain and immediately place peppers into a bowl of ice water.

2)  Preheat oven to 400’.  Non stick foil line a cookie sheet and evenly coat with 2 teaspoons of olive oil.  Set aside.

3)  Once peppers are cool, cut in half and carefully remove the seeds and membrane.  I highly recommend wearing gloves.  Season pepper halves generously with salt.

4)  In a medium size mixing bowl, beat the goat cheese, cream cheese and Worcestershire sauce.  Add the cheddar and the minced piquillo peppers.

5)  Stuff each pepper with cheese.  Dip into beaten egg and then into panko crumbs, coat well.  Place on prepared cookie sheet and drizzle with olive oil.  Bake for 15 minutes.  While the peppers are baking, whisk the raspberry preserves and rice wine vinegar together.  Serve stuffed peppers with sauce.

*can be made a day ahead, refrigerated, then baked.
Greek Bruschetta…..

You must try this very easy appetizer.  Albeit a messy one, serve it to friends and family who could care less if you bank an olive off your third button right into your drink!  I love the color and the fresh taste.  Simple and delicious!

Greek Bruschetta

1 12 ounce can pitted kalamata olives, drained and sliced
1 14 ounce can artichokes, drained and chopped
8 ounces of grape tomatoes sliced in quarters
1/2 cup crumbled feta cheese
1/2 cup chopped parsley
3 tablespoons olive oil
1 tablespoon dried oregano
1 large clove garlic, crushed
2 tablespoons lemon juice
season to taste

Combine all ingredients together in a medium size mixing bowl.  Refrigerate until ready to serve.  Refrigerate any leftovers.

To toast the baguette:

1 whole Baguette, day old or more is best, cut into 1/2″ slices
2 tablespoons or more olive oil
Kosher salt

1) Preheat oven to 300’.
2) Slice stale bread into ½ ” slices. Using a pastry brush, coat both sides of the bread with olive oil. Season with a couple of pinches of kosher salt. Spread out over a large cookie sheet and bake for 15 minutes, give them a turn after about 8 minutes.  Remove from oven and allow to cool.
3)  When ready to serve, simply spoon the vegetables mixture over toasted baguette.  Serves 8-10.  Enjoy!

Warm Artichoke and Goat Cheese Dip….

I came up with this recipe for my sweet Mother in Law Patricia.   I was thinking I wanted a warm goat cheese dip with artichokes, it turned out great!  It’s the perfect combination of creamy goat and cream cheese, artichokes, tomatoes, and garlic.  Topped with yummy bread crumbs, butter, and parmesan.  It’s SO GOOD! It goes together in minutes and would be great to serve for any party.  I’m going to make it for the Super Bowl!

Warm Artichoke and Goat Cheese Dip

1 8 oz. package cream cheese, softened
1 can artichokes, drained and chopped
1 tablespoon olive oil
4 plum tomatoes, seeded and diced
3 large cloves garlic, crushed
1 small bunch fresh basil
2 pinches salt
1 pinch pepper
1 4 oz. package goat cheese, crumbled
1/3 cup seasoned bread crumbs
2 tablespoons parmesan cheese
1 tablespoon melted butter
2 teaspoons dried parsley flakes

1) Preheat oven to 375’. You will need a 1 ½ to 2 quart baking dish. Spread cream cheese into the bottom of baking dish. Spread chopped and drained artichokes over cheese. Set aside.
2) In a small sauté pan, heat over medium heat and add olive oil. Add diced tomatoes, cook until soft, about 3 minutes, season with salt and pepper. Add garlic and cook another minute. Add thinly sliced fresh basil and stir to combine. Spread evenly over artichoke layer. Add crumbled goat cheese.
3) In a large measuring cup, melt butter in microwave. Once melted, add bread crumbs and parmesan cheese. Mix well. Sprinkle evenly over the goat cheese layer. Bake for 12-15 minutes. Sprinkle with parsley flakes. Serves 8. Serve with crispy pita chips.

*Try adding cooked chopped shrimp or crab over the tomato/garlic layer….OH BOY!

Buffalo Wings….

I absolutely love spicy chicken wings.  Try making these, they’re baked!  Believe me, they come out very crispy, you would never know that they were not fried.  The sauce is outstanding.  Be sure to serve with my Light Bleu Cheese Dressing, and crunchy carrot and celery sticks, fantastic!  Enjoy!
Oven Fried Buffalo Chicken Wings

For the chicken:
2-3 lbs. chicken wings
Salt and pepper
2 tablespoons flour
1 tablespoon vegetable oil

For the sauce:

½ cup Open Pit Original BBQ Sauce or your favorite sauce
1/4 cup ketchup
¼ cup Red Hot Sauce
2 teaspoons butter

1) Preheat oven to 400’. Non stick foil line a cookie sheet with sides. Set aside.
2) Cut wings into pieces at joints (discard the little flapper portion) and place on prepared cookie sheet. Generously season wings with salt and pepper. Sprinkle flour over wings and toss to coat. Arrange on cookie sheet so they’re not touching. Drizzle the vegetable oil over the prepared wings.  Bake for about 50 minutes or until wings are very crispy.
3) While wings are baking, add all sauce ingredients to a large sauce pan. When the wings are almost finished baking, warm sauce over medium heat and mix well.  Remove from heat.
4) Remove wings from oven right onto a paper towel lined plate. Add the hot wings to the sauce pot. Toss to coat. Serve immediately with bleu cheese dressing and celery and carrot sticks. 

Chicken Satay with Peanut Sauce…..

This is one of my favorite appetizers.  It is quite simple and easy to make ahead of time.  The peanut sauce is fantastic!  For a different twist, try tossing the grilled chicken pieces, a pinch of red pepper flakes,  and peanut sauce with a pound of hot angel hair pasta and  top with chopped cilantro….OMG, delish! 
Chicken Satay with Peanut Sauce

For the marinade:
4 tablespoons low sodium soy sauce
4 tablespoons lime juice
2 tablespoons canola or vegetable oil
2 teaspoons cumin
2 teaspoons turmeric
4 teaspoons coriander
2 lbs. boneless skinless chicken breast or thighs cut into 1” pieces
32 or more 6” bamboo skewers, soaked in water for 20-30 minutes

For the Sauce:
2 tablespoons oil
1/3 cup finely chopped onion
2 teaspoons chili powder
½ of marinade
1 cup creamy peanut butter
¼ cup brown sugar
1/2 cup water plus more if needed
Cilantro
Lime wedges

1) Combine all marinade ingredients and set aside. Cut the chicken into 1” pieces skewer 3 pieces per skewer. Pour half of the marinade over chicken and marinate for an hour.
2) For the sauce, heat oil in a medium saucepan over medium heat. Sauté onions for 5-7 minutes. Add chili powder and reserved marinade, brown sugar, and ½ cup of water. Continue over heat until very hot. Remove from heat and add peanut butter, carefully whisk until completely incorporated. Add additional water if the sauce is too thick. Loosely cover and set aside. To warm the sauce, do so in microwave on 50% power for 30 seconds at a time. Heat until just warm. If you over heat the sauce, the oil will separate.
3) Cook chicken over preheated grill 8-12 minutes. Serve with peanut sauce and garnish with cilantro and fresh lime wedges. Makes approximately 32 skewers.  Allow for 2-3 per person per serving.

Grilled Garlic Shrimp Over Baguette….

When I had my gal pals over for food and bubbly, this seemed to be the favorite.  This is a beautiful and extremely flavourful appetizer.  At the end when you put the shrimp on top of the bread, be sure to baste with plenty of the flavorful butter and garlic mixture.  It will soak into the yummy grilled bread.  There are a few steps in the preparation process, but they’re very simple.  If you’re entertaining, prepare everything right up to the cooking.  All you’ll have to do is about 10 minutes of grilling and you’re ready to serve.

Garlic Lemon Shrimp Over Grilled Baguette

2 lbs. large deveined frozen shrimp, thawed and peeled leaving tails
2 tablespoons olive oil
Pinch of salt and pepper
16-18 6” bamboo skewers, soaked in water for 20 minutes

For the lemon butter:

4 tablespoons unsalted butter
2 tablespoons olive oil
3 cloves crushed garlic
2 pinches kosher salt
2 pinches black pepper
1 whole lemon, zested, then juiced
2 large baguettes, cut into 6″ pieces, then halved

Garnishes

3 tablespoons Italian parsley, finely chopped
2 lemons cut into wedges

1) If you’re using bamboo skewers, soak in water for 20 minutes. To thaw frozen shrimp: place in a large bowl and allow cold water to slowly run into bowl and down drain. Once thawed, peel and drain in colander. Put shrimp into a dry bowl. Toss with olive oil, salt, and pepper. Skewer 2 per skewer. Refrigerate.
2) Put all sauce ingredients into a microwavable dish. Refrigerate.
3) When ready to cook, preheat grill.  Cut baguette and set aside.
4) Microwave the sauce ingredients until just melted.
5) Grill the bread first on both sides, you just want to get the bread a little crunchy with grill marks.  Cut each piece in half on a diagonal and place on a large serving platter. Grill the shrimp for 2-3 minutes per side or until bright pink. Immediately place the grilled shrimp on the grilled bread in a criss cross.
6) Generously baste with the lemon and garlic butter mixture. Garnish with chopped parsley and a fresh lemon wedge.  Enjoy!

Isn’t this an elegant presentation???

Enjoy!
Angie


Baked Tortilla Chips and Strips…..

Baked Tortilla Chips
Baked Tortilla Strips are great in salads

Why not bake your own tortilla chips?  They’re much less expensive and have only 3 ingredients.  You will notice a big difference between these homemade chips and commercial ones, they have a true corn taste. You could also spice them up if you wanted to with a little chili powder and cumin, or a pinch of cayenne.

I love the baked tortilla strips.  When I make tacos for my kids I make a taco salad for myself with just a few of these.  Try these crunchy salad yummies on my Grilled Chicken Salad with Jicama.  Make a nice amount and store in an air tight container or a zip bag and they’re ready to go the next time you need them. 

Baked Tortilla Chips or Strips

1 dozen corn tortillas, for chips cut into 4’s, or cut into thin strips
1 teaspoon canola or olive oil
2-3 pinches of kosher salt

1) Preheat oven to 300’.
2) Place cut tortillas into a medium size mixing bowl. Drizzle olive oil over and add salt. Toss carefully with your hands to evenly coat. Spread the chips/strips over a cookie sheet being careful not to overlap. You will have to bake in a couple of batches. Bake for 20-22 minutes or until completely dry. Cool completely and store in an air tight zip bag or container.

*Serve chips with your favorite dip or strips over salads

Light Bleu Cheese Dressing or Dip…..

You simply have to try this dressing/dip recipe.  It is absolutely delicious….no kidding, it’s my favorite.  Compare this ingredient list to any bottled you’ve tried..made with real ingredients.  This will keep for up to two weeks in the refrigerator, although I doubt it will last that long!  Get your hands on some heirloom mini tomatoes, aren’t they beautiful?  Try dipping spicy chicken wings in this dip, fantastic!!!

Bleu Cheese Dressing or Dip
1 cup plain low fat yogurt
2 tablespoons sour cream, use light if you wish
2 tablespoons olive oil mayonnaise, or any you may have
¼ cup bleu cheese crumbles
½ teaspoon salt
¼ teaspoon pepper

Mix all ingredients together and refrigerate. Serve with crudités (fancy word for cut veggies) or use as a salad dressing. Great for dipping spicy chicken wings! Refrigerate for up to 2 weeks. Makes about 1 1/4 cup.

*add a little milk if it’s too thick for salad dressing

Roasted Garlic & Cannelli Bean Hummus….

This is the perfect appetizer.  So easy, elegant, and quick.  Make ahead and serve right when your guests arrive.   Keep several varieties of canned beans on hand, they are so versatile and you can whip up this excellent hummus in a snap.  I especially love the cannelli beans (aka white kidney beans) because they are so creamy when you process them, no need for tahini, they are great with the few true ingredients in this recipe. I made the toasted baguette myself,  it’s much more economical than those bags of pita chips or bagel chips.   Hummus keeps for a couple of weeks in the refrigerator.  Also delicious on sandwiches or as a dip on a vegetable tray.  Good fiber and all healthy.  As always, real ingredients. 

Roasted Garlic Hummus with Cannelli Beans

½ cup olive oil (don’t worry; this isn’t all going into recipe! Use later for cooking or in salad dressing, sooooo good!)
4 large cloves garlic, peeled and halved
2 tablespoons lemon juice, bottled or fresh
2 cans cannelli beans, drained but reserve liquid
½ teaspoon smoked paprika + an extra pinch for garnish
½ teaspoon salt
¼ teaspoon pepper
2 tablespoons fresh parsley, finely chopped

1) In a very small sauce pan, add olive oil and fresh garlic. Cook on lowest setting of stove top until garlic is just soft and slightly brown, about 20 minutes. Remove from heat.
2) Into food processor, add about 2 tablespoons of the reserved garlic olive oil, lemon juice, roasted garlic cloves, cannelli beans, half of the reserved liquid from the beans, paprika, salt and pepper. Process until smooth; add more of the reserved bean liquid if necessary. Taste, add more salt and pepper if necessary.
3) When ready to serve, pour into a pretty serving dish. Drizzle some of the reserved garlic olive oil over hummus. For garnish sprinkle a pinch of smoked paprika over the top and finally, the chopped parsley. Beautiful! Serve with pita chips, warm pita bread, or your own toasted baguette.

Easy Baguette Toasts….

Delicious, economical, easy, very short ingredient list.

Toasted baguette

Baguette, day old or more is best
Olive oil
Kosher salt

1) Preheat oven to 300’.
2) Slice stale bread into ¼” slices. Put into a large bowl and drizzle with olive oil. Add a couple of pinches of kosher salt. Spread out over a large cookie sheet and bake for 15 minutes. Remove from heat and allow to cool.

*always refrigerate leftover breads to use for later, they will keep much longer.