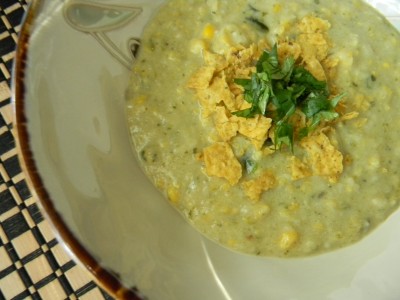
Roasted Poblano, Corn and Tortilla Chowder…..

Recently I saw Ina Garten on the Food Channel and she used corn tortillas to thicken a chicken tortilla soup.  Brilliant!  Not to mention the wonderful flavor the tortillas add to the soup.  This soup is surprisingly light for how decadent it tastes!  Make it vegetarian by using vegetable stock in place of the chicken stock.  So good!

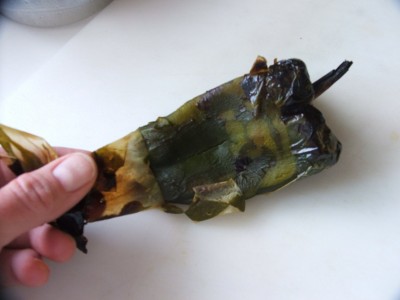
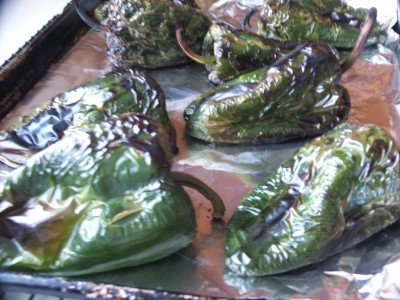
The first thing you need to do is roast the poblano peppers.  This is a very simple process and a very necessary step for flavor in this soup/chowder.

Begin by broiling or grilling the peppers until they get charred and blistered.  Remove from heat and put them into a bowl and cover tightly with foil and allow them to steam for about 20 minutes.  This will make it easier to remove the skin.

Once they’re cool enough to handle, carefully remove the skins from the peppers.  Do not rinse them, you’ll lose the “charred” flavor.

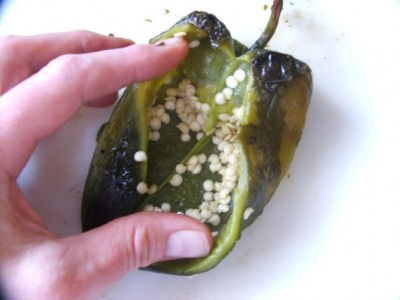
Lastly, remove the seeds and membrane.  Chop coarsely.  They’re ready for the chowder.

Roasted Poblano, Corn and Tortilla Chowder

6 roasted poblano peppers, peeled, seeded and chopped
2 cups chopped sweet onions
3 tablespoons olive oil
4-6 cloves finely chopped garlic
1 teaspoon dried rosemary, crushed between your fingers (will release the flavor)
1 1/2 teaspoons cumin
1 bay leaf
4 cups chicken stock, salt free preferably (you can add your own seasoning later, if you use stock with salt, adjust the addition of salt later in the recipe)
6 cups of sweet white corn (fresh or frozen)
4 cups 1% milk (or whatever you have)
6 corn tortillas, cut into strips
2 tablespoons fresh lime juice (or bottled)

Garnish
Tortilla chips coarsely crushed
Fresh cilantro
Fresh lime wedge
1)  Prepare the poblano peppers. Rinse the peppers and place under the broiler in the oven or on a hot grill.  Cook until they’re nicely blistered.  Put them into a bowl and cover with foil or a lid to steam.  This will make the skins easier to remove.   When they’re cool enough to handle,  remove the skins, seeds and membrane.  Coarsely chop and refrigerate until you’re ready to use.
2)  In a soup pot, add the olive oil and onions.  Cook for 7-10 minutes or until soft.  Add the garlic, rosemary, cumin and bay leaf.  After about one minute, add the the stock, prepared peppers and corn.  Bring to a low simmer for about 20 minutes.  Add the milk and bring it up to a simmer again, do not boil.  Season with salt and pepper.
3)  Add the tortilla strips and stir often until the tortillas have completely dissolved.  If you’d like it a little thicker, add additional tortilla.  Stir in the lime juice.  Garish with crushed crispy tortillas, chopped cilantro and a lime wedge.  Makes about 12 one cup servings.

Enjoy!

Angie
 

Naturopath…..

I had a friend who went to a naturopath years and years ago and had blood-work done to determine what, if any, food sensitivities she had.  Interestingly, she had a list of foods that were optimal, some that were foods she should only enjoy on occasion and foods to completely avoid.

It makes a lot of sense, doesn’t it?  We all have our own unique genetic make up.  It would make sense too that we all must have some food sensitivities, right?  There are many foods that cause inflammation, which can lead to disease.    I think at a certain age the body says enough is enough!  For me, I have periods of fatigue early in the day and I’m thinking it has to do with what I’m eating.  It’s hard to narrow down exactly what it might be as I have a very diverse diet,  I love most everything!  I’m a bit too impatient to do an elimination diet.  This is where you eliminate a food, like say dairy,  for a few weeks and see how you feel.

I am thrilled to have an appointment with a naturopath doctor this week.   I can’t wait to see what she has to say after she analyzes my blood work.  Gee, I got to thinking what if she says I shouldn’t eat wheat?  Eggs?  Dairy?

I guess if it makes me feel a ton better, who cares?  I am a good cook and pretty much can figure out how to get the most flavor out of most any kind of food.  I sure could figure out how to bake gluten free or cook without dairy.

I will report the findings after I get results.  So interesting!

Have a great week!

Angie

UFO Identified, Plantains & Fried Plantains….

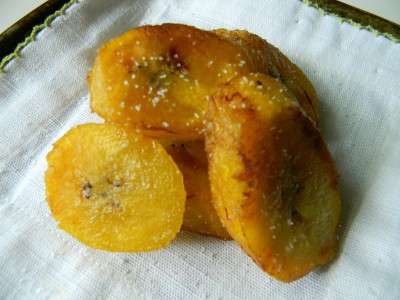
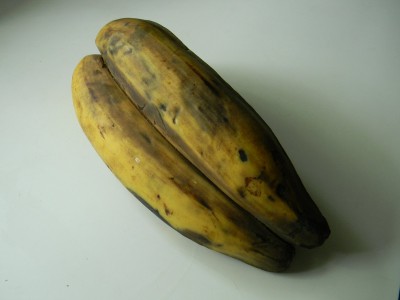
Thank you Chels for identifying this UFO!   Hard to believe that something so unattractive could turn out so beautiful.  The UFO in the previous post is a plantain.  This South American fruit couldn’t be easier to prepare.  It resembles a banana but has a different taste and texture than a regular banana.  For starters they have a much more starchy taste and unlike a regular banana can’t be just peeled and eaten.  They require a little love before you can enjoy.  Because of the amount of starch they fry beautifully.

I prefer a darker plantain as they are a bit sweeter and have a softer texture.  The peeling is not as pliable as a regular banana either.  Slice off the very top and bottom and run a sharp knife through the skin and peel.  Slice the plantain on a diagonal.

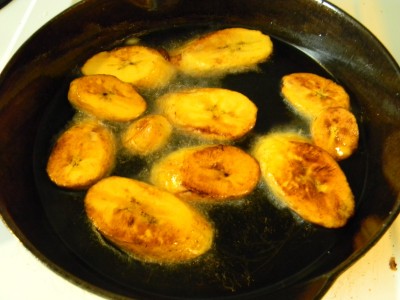
Next heat about 1/2″  of canola oil to about 325-350′.  I use a shallow cast iron skillet as it has excellent heat conduction.  They take only minutes on each side to brown.

Allow the fried plantains to drain on paper towel.  Season simply with kosher salt and you’re ready to serve.                      Serve as a delicious side dish alongside  Grilled Flank Steak with Chimichurri Sauce for an authenthic South American dinner.

Interesting and very delicious!

Have a great day!

Angie

Can You Identify This UFO?

Looks simple enough, right?  Can you identify this “unidentified food object?”  If you know what it is, do you know what to do with it?

I love walking though the produce department in different neighborhoods and inquiring about vegetables and fruits I’ve never seen before, much less tried.  So fun!  I most often grill the produce people as to what they are, where they came from and what the heck to do with it.  If the produce person doesn’t know what to do with it, you can always google:-)

Let me know what you think about this one~

Have a great day!

Angie

Beautiful Easter Egg Cookies…..

I just love to decorate cookies.  These are pretty and equally yummy.   My cut out cookie recipe is very basic.  I mix the dough the day before I plan to bake.  This gives the dough plenty of time to chill in the refrigerator.  Remember that the first batch you roll out is a little tough, after that, when you add the dough scraps to a fresh piece of dough, it gets easier to manage and roll out.

Check out my cookie baking tips.

When working with chocolate here’s what I do.  I use semi-chocolate chips and melt in the microwave for 30 second intervals.  Mix between each interval.  Microwave the chocolate until the chocolate is smooth when you stir.  Do not over heat, it will burn.  Do not allow any moisture/water to get into the chocolate.

Instead of dipping cookies into chocolate, I spread it with a spatula, like icing.  The best thing about this is that it sets up beautifully and make them very easy to transport.

Step 1:  mix dough, chill over night.
Step 2:  bake and cool cookies
Step 3:  melt chocolate chips and spread over cookie.  Add any decorations into the melted chocolate.  It will set up and keep decorations in place.
Step4:  once the chocolate is completely set, make simple icing and spread over cookie.  Allow the cookies to sit out at room temperature for several hours or overnight.  The icing will set and the cookies will package beautifully or go onto a tray without getting messed up.

Best Roll Cut Out Sugar Cookie Recipe

2 cups sugar
4 sticks unsalted butter, one pound at room temperature
5 large eggs
1 tablespoon vanilla
7 ½ cups all purpose flour
4 teaspoons baking powder
1 teaspoon salt

Icing (recipe below)

1) In a large mixing bowl, beat butter until fluffy and add one half of the sugar, beat, then add the rest. Add two eggs and beat. Scrape down the side of the bowl. Add the remaining three eggs and vanilla, beat until nicely incorporated.
2) Lightly measure out flour into a separate mixing bowl. Add baking powder and salt, whisk until blended.
3) Add half of the flour mixture to the egg/butter mixture and beat well. Add remaining flour and blend until all ingredients are incorporated.
4) Shape into a large ball and wrap in plastic wrap, then put into a large zip bag. Refrigerate for a couple of hours or overnight.
5) When ready to bake, allow to sit at room temperature for 30 minutes. Preheat your oven to 375’ and line cookie sheets with parchment paper. Have cooling racks ready to receive hot cookies.
6) Cut off a chunk and begin working with your hands to make it pliable enough to roll out on a floured surface. Roll to 1/8” thickness. Cut out with your favorite shapes and place on prepared sheets, leaving at least 1” of space between cookies. Bake for 7-8 minutes. Cool for five minutes before removing from cookie sheet onto a rack. Cool completely before icing.

For the icing:

3 cups powdered sugar
milk or water
1/2 teaspoon clear vanilla
gel food coloring, available at craft stores such as Michael’s

Put the powdered sugar into a medium size bowl.  Add liquid small amounts at a time and stir.  You will want the consistency to be thick enough that it will not run off the cookie but loose enough to easily spread.  Don’t worry, if it isn’t perfect on the first cookie you can either add more liquid or more sugar to get the right consistency.

When making different colors, use small bowls for different colors.

For the tie dye affect ice the cookie with white icing.  With a toothpick, dip into another colored icing and simply swirl through the freshly iced white cookie.  Very pretty.

Have a blessed Easter weekend with your family and friends!

Angie

Traditional Croatian Easter Bread (Sirnica)…..

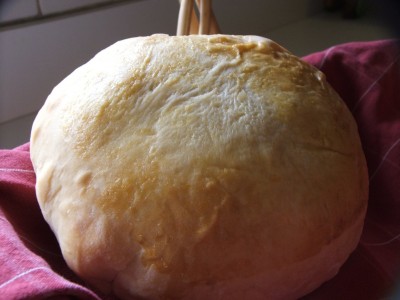
I absolutely love learning about food traditions of other ethnicitys.    I think it’s my favorite part about being a cook.    Every week I try to make something I’ve never made before, sort of a dinner passport to different places all around the world.  This holy week, I’ll be making Croatian Easter Bread.   Check out another interesting version of this bread made with boiled, colored eggs, so interesting and beautiful!

Heather with her darling daughters Sadie,Clara, and Fiona.

I first had the pleasure of tasting this delicious bread when my friend Heather surprised me with a loaf right before Easter last year.  I was honored that she would share a loaf of her treasured family recipe.    It had a gentle yet distinctive citrus taste and was very pleasantly sweet without being too sweet.  Tender, moist, and delicious.   Of course, after the first bite I wanted to make this bread for all Easter Dinners going forward.  Heather kindly shared her recipe.

Try this Croatian Easter Bread.  It may become the next family tradition in your family:-)

Traditional Croatian Easter Bread
(Sirnica)

Ingredients:

2 cups milk
1 package active dry yeast or 2 ¼ teaspoon

½ cup softened butter (1 stick)
½ cup sugar
2 large eggs
1 teaspoon salt
Zest of half of a lemon and half of an orange
6 cups all purpose flour
Crushed sugar cubes or sugar for dusting

1) Slightly heat the milk in a microwave. Add the yeast and set aside. (about 10-15 minutes or until yeast is dissolved and a little bubbly)

2) Meanwhile, in a large bowl or stand mixer, beat the butter, and sugar, then add the eggs and salt, and zest, beat until well blended. Add the yeast-milk mixture and half of the flour, beat well. Add remaining flour gradually, until a smooth, soft dough forms. (you may not use all the flour or may require more)

3) Place the dough in a large greased bowl, burning to coat both sides, and let rise, covered, until doubled. Punch down and turn out onto lightly floured surface and knead for 2 minutes.

4) Preheat oven to 375′.  Divide dough into 4 to 6 equal pieces, shape into a nice round ball. Cover and allow to rest 5 minutes.

5) Place dough on cookie parchment lined cookie sheet. Egg wash the dough with 1 large beaten egg and 1 tablespoon of water. Sprinkle with crushed sugar cubes. Bake for 20 minutes or until golden brown. Cool completely.

*one way to check if a yeast bread for doneness is to thump it with your fingers, if it sounds hollow, it’s done. Be sure that you have a nice brown color was well.

Grilled Salmon with Brown Sugar and Mustard Glaze…..

This recipe for salmon couldn’t be more simple.   My friend Mickey shared her recipe years ago and it’s been a favorite of mine ever since.

Amazingly, there are only three ingredients.  Salmon, whole grain mustard and brown sugar.  That’s it.  It is best prepared on the grill.  You’ll want to flip the salmon onto a piece of non stick foil to finish the cooking otherwise you will lose all the goodies in the grill.

Preheat the grill.

You will need:

4 6-8 ounce salmon fillets
8 tablespoons of whole grain mustard
8 tablespoons brown sugar

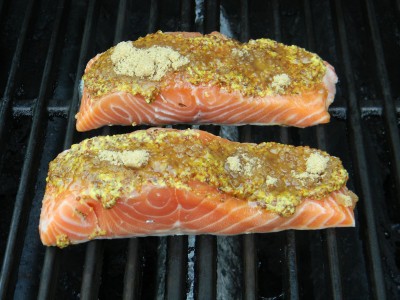
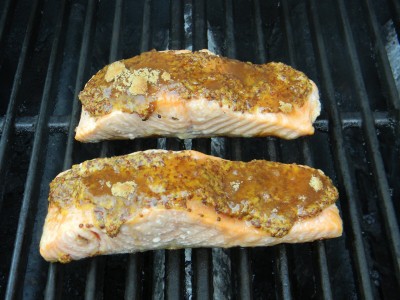
Start by rinsing the salmon and patting dry with a paper towel.  Place on a plate for grill transport.  Spread 2 tablespoons of mustard evenly over each piece of salmon.  Add the brown sugar, patting it into the mustard.

Gently place the salmon fillets on the grill, skin side down.  Close the lid and let them cook for about 8 minutes.
The fillets should now look opaque.
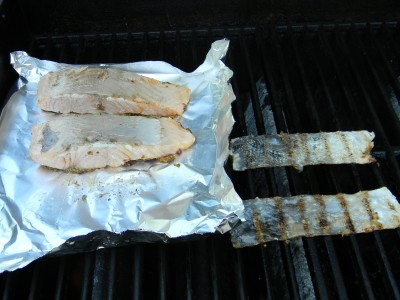
Gently slide your spatula between the flesh of the salmon and the skin and flip onto the non stick foil.  You can see that I’ve turned the edges of the foil up to keep the topping from dripping into the grill.  Close the lid and cook for  5-7 minutes.  Discard the skin.
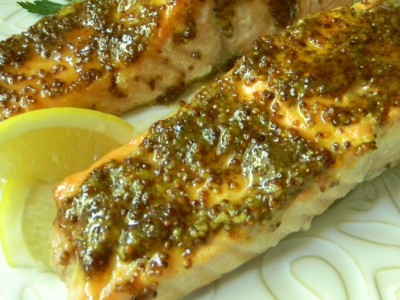
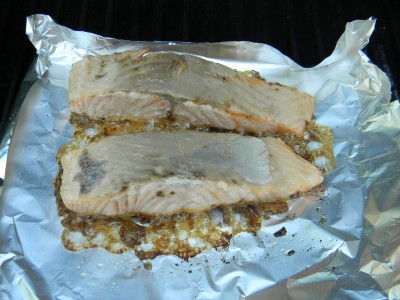
 The salmon is done and you can see that the mustard and brown sugar have caramelized.  Carefully remove the fish/foil from the grill.  It is easy to slide onto a flat cookie sheet.  Turn the salmon over onto a clean serving plate and spoon the mustard/sugar mixture over the salmon.

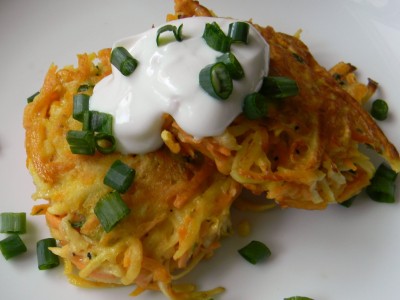
Serve with sweet potato and parsnip latkes  and oven roasted asparagus.  Elegant and delicious!

Have a great evening!

Angie

Perfectly Grilled Pork Chops…..

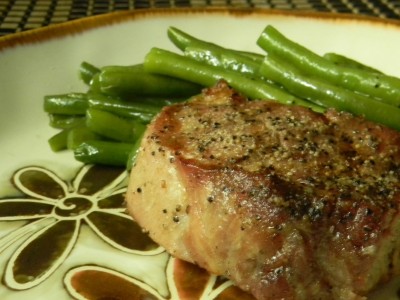
We had grilled pork chops tonight and everyone cleaned their plates!   I thought I’d share a few tips on grilling pork chops.

1)  First and foremost, buy a whole boneless pork loin.  Watch the sale papers as whole pork loin often goes on sale.  Buy a couple and freeze one for later, they thaw beautifully.    I usually figure 6-8 ounces per serving.  Remove the loin from the store packaging and wrap with cling wrap.  Wrap with heavy duty foil, label and date.  When you want to thaw it out, you can do so in the refrigerator for a couple of days or I put the wrapped loin in a zip bag and let it sit in a large bowl of water.  Place the bowl in the refrigerator to keep it safe.  It will take several hours but will be much quicker than thawing in the refrigerator.  Give it a turn after a couple of hours.
2)  With a very sharp knife, cut the loin into equally sized chops to your desired thickness.  I like  1 1/2″ chops.
3)  Season however you wish.  Tonight I used Penzey’s Chicago Steak Seasoning but you could season very simply with kosher salt and fresh ground black pepper and a little granulated garlic.
4)  Allow the seasoned chops to sit at room temperature for 30 minutes before grilling.
5)  Preheat the grill.  Lower the heat to medium-low.  Place the room temperature chops on the grill and close the lid.  Resist moving them around, allow them to sit.  For a 1 1/2″ thick chop, cook on medium low for 5 minutes then give a quarter turn for nice grill marks.  Close lid and cook another 5 minutes.  You should be able to see that the meat is cooking up from the bottom and it’s becoming opaque.  Flip the chops and cook another 5-8 minutes.  An instant read thermometer should read 140′.  Allow the meat to sit covered with foil for 10 minutes before serving.  Spoon those lovely juices that accumulate on the plate over the chops when serving.  Cooking lean pork over high heat will dry them out quickly.  Also, know that it’s ok for the center of the pork to be slightly pink.  Some restaurants even serve it medium, not my personal preference.

There you have it.  Moist, juicy, tender, inexpensive and most of all, delicious and perfectly grilled pork chops.  Serve with grilled onions and mushrooms, a simple baked potato and steamed green beans.  Simple perfect dinner.

Have a great day!

Angie

Goat Cheese And Herb Stuffed Chicken Breasts….Step By Step Instruction….

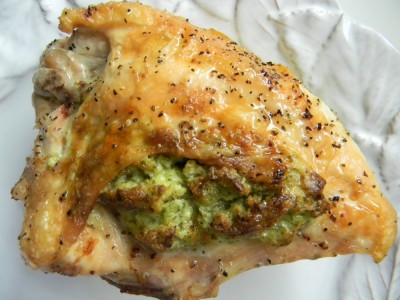
I love stuffed chicken breasts but sometimes they can dry out.  I decided to stuff bone in breasts with skin.  The end result is moist and juicy.  I’ll take you though how to prepare the chicken breasts for stuffing.  Serve with rice pilaf and a simple vegetable or salad.  They can be stuffed ahead of time and ready to go in the refrigerator.   Bake while dinner guests are enjoying appetizers and cocktails.  So easy!

As with any recipe, you can make your own yummy variation.  I think sundried tomato pesto and goat cheese would be fantastic as well!  Don’t care for goat cheese?  Use blue cheese instead.  The possibilities are endless!

Here we go…

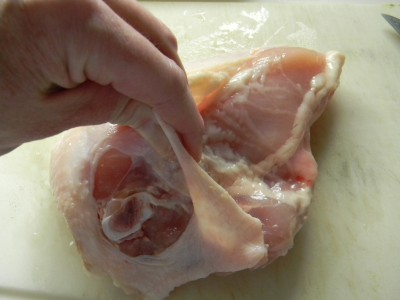
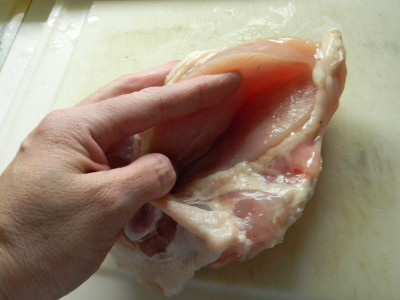
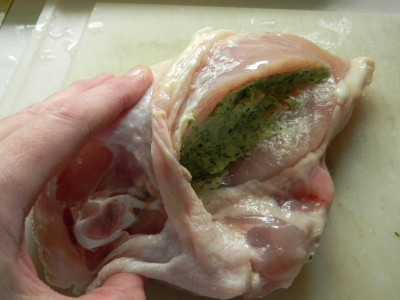
Start by gently pulling the skin back without tearing it.  Try to keep the skin intact a little on the rib side as well.

Using a very sharp knife, make a slit in the flesh, try not to cut completely through the breast.  The slit should be large enough for about 3 tablespoons of the cheese filling.

Stuff the breast with about 2-3 tablespoons of the cheese filling.

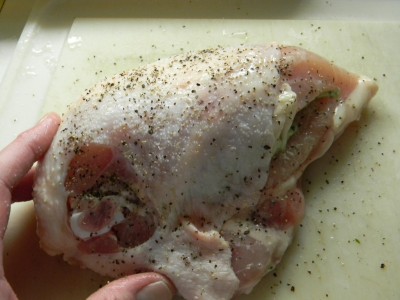
Gently bring the chicken breast back together, pulling the skin over to cover.  Season generously with kosher salt and pepper.  Now you’re ready for the oven!  If you are making them ahead to bake later, cover and refrigerate immediately.  Take them out 30 minutes before baking.  Give the chicken a light drizzle of olive oil just before going into the oven.

Goat Cheese and Herb Stuffed Chicken Breasts

For the filling:

4 ounces goat cheese
4 ounces of softened cream cheese
3 tablespoons milk
3 tablespoons of panko bread crumbs (or use 3 tablespoons of regular)
2 tablespoons finely chopped parsley
2 tablespoons finely chopped chives
2 large cloves crushed garlic
2 dashes of Worcestershire or hot sauce
2 pinches kosher salt
1 pinch black pepper

4 large chicken breasts with skin and bone (or 6-8 chicken thighs)

1)  Foil line a roasting pan large enough to easily fit the chicken breasts.  Preheat the oven to 375′.
2)  In a medium size bowl with a hand mixer, beat the goat cheese, cream cheese and milk until smooth.  Gently stir in the rest of the ingredients until well blended.
3)  Rinse and dry the chicken breasts.  Gently pull the skin back from the center of the rib, keeping it intact on both sides of the breast.  Using a sharp knife, cut a large horizontal slit in the chicken breast, being careful not to cut completely through to the other side.
4)  Stuff each breast with 1/4 of the cheese mixture.  Gently pull the flesh and skin back over the stuffing.  Season generously with kosher salt and pepper.  Place into baking pan and lightly drizzle the chicken with olive oil.  Bake for 50-60 minutes.  Allow to sit for 10 minutes tented with foil before serving.  Makes four generous servings.

E
njoy!!

Angie

Tip: Freeze Over Ripe Bananas…..

Good morning!

What to do with those over ripe bananas?  Maybe you don’t have the time to bake within a couple of days?  Simple peel and freeze them.  Use a zip plastic bag, get as much air out of the bag as possible.  As always, label and date.  They’ll keep in the freezer for about 3 months.

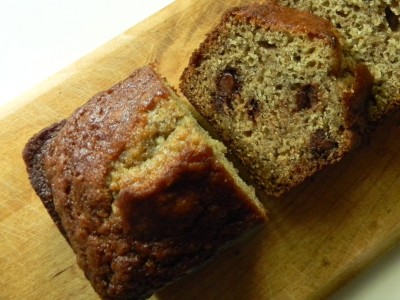
When you thaw them out, they will be the most unappealing looking bananas ever, but they will make the most moist and delicious banana bread ever!  In this recipe, use 2 cups of the frozen bananas, liquid and all.  If you have an immersion blender, it’s best to liquefy the wet ingredients before adding to the dry ingredients.  You can also do this in a blender.

Have a great spring day!

Angie