My Flowers….

Humans aren’t the only ones anxious for spring!  My hibiscus has been flowering consistently over the past couple of months!  My African Violets were in full bloom a couple of months ago.  They displayed gorgeous periwinkle colored flowers.

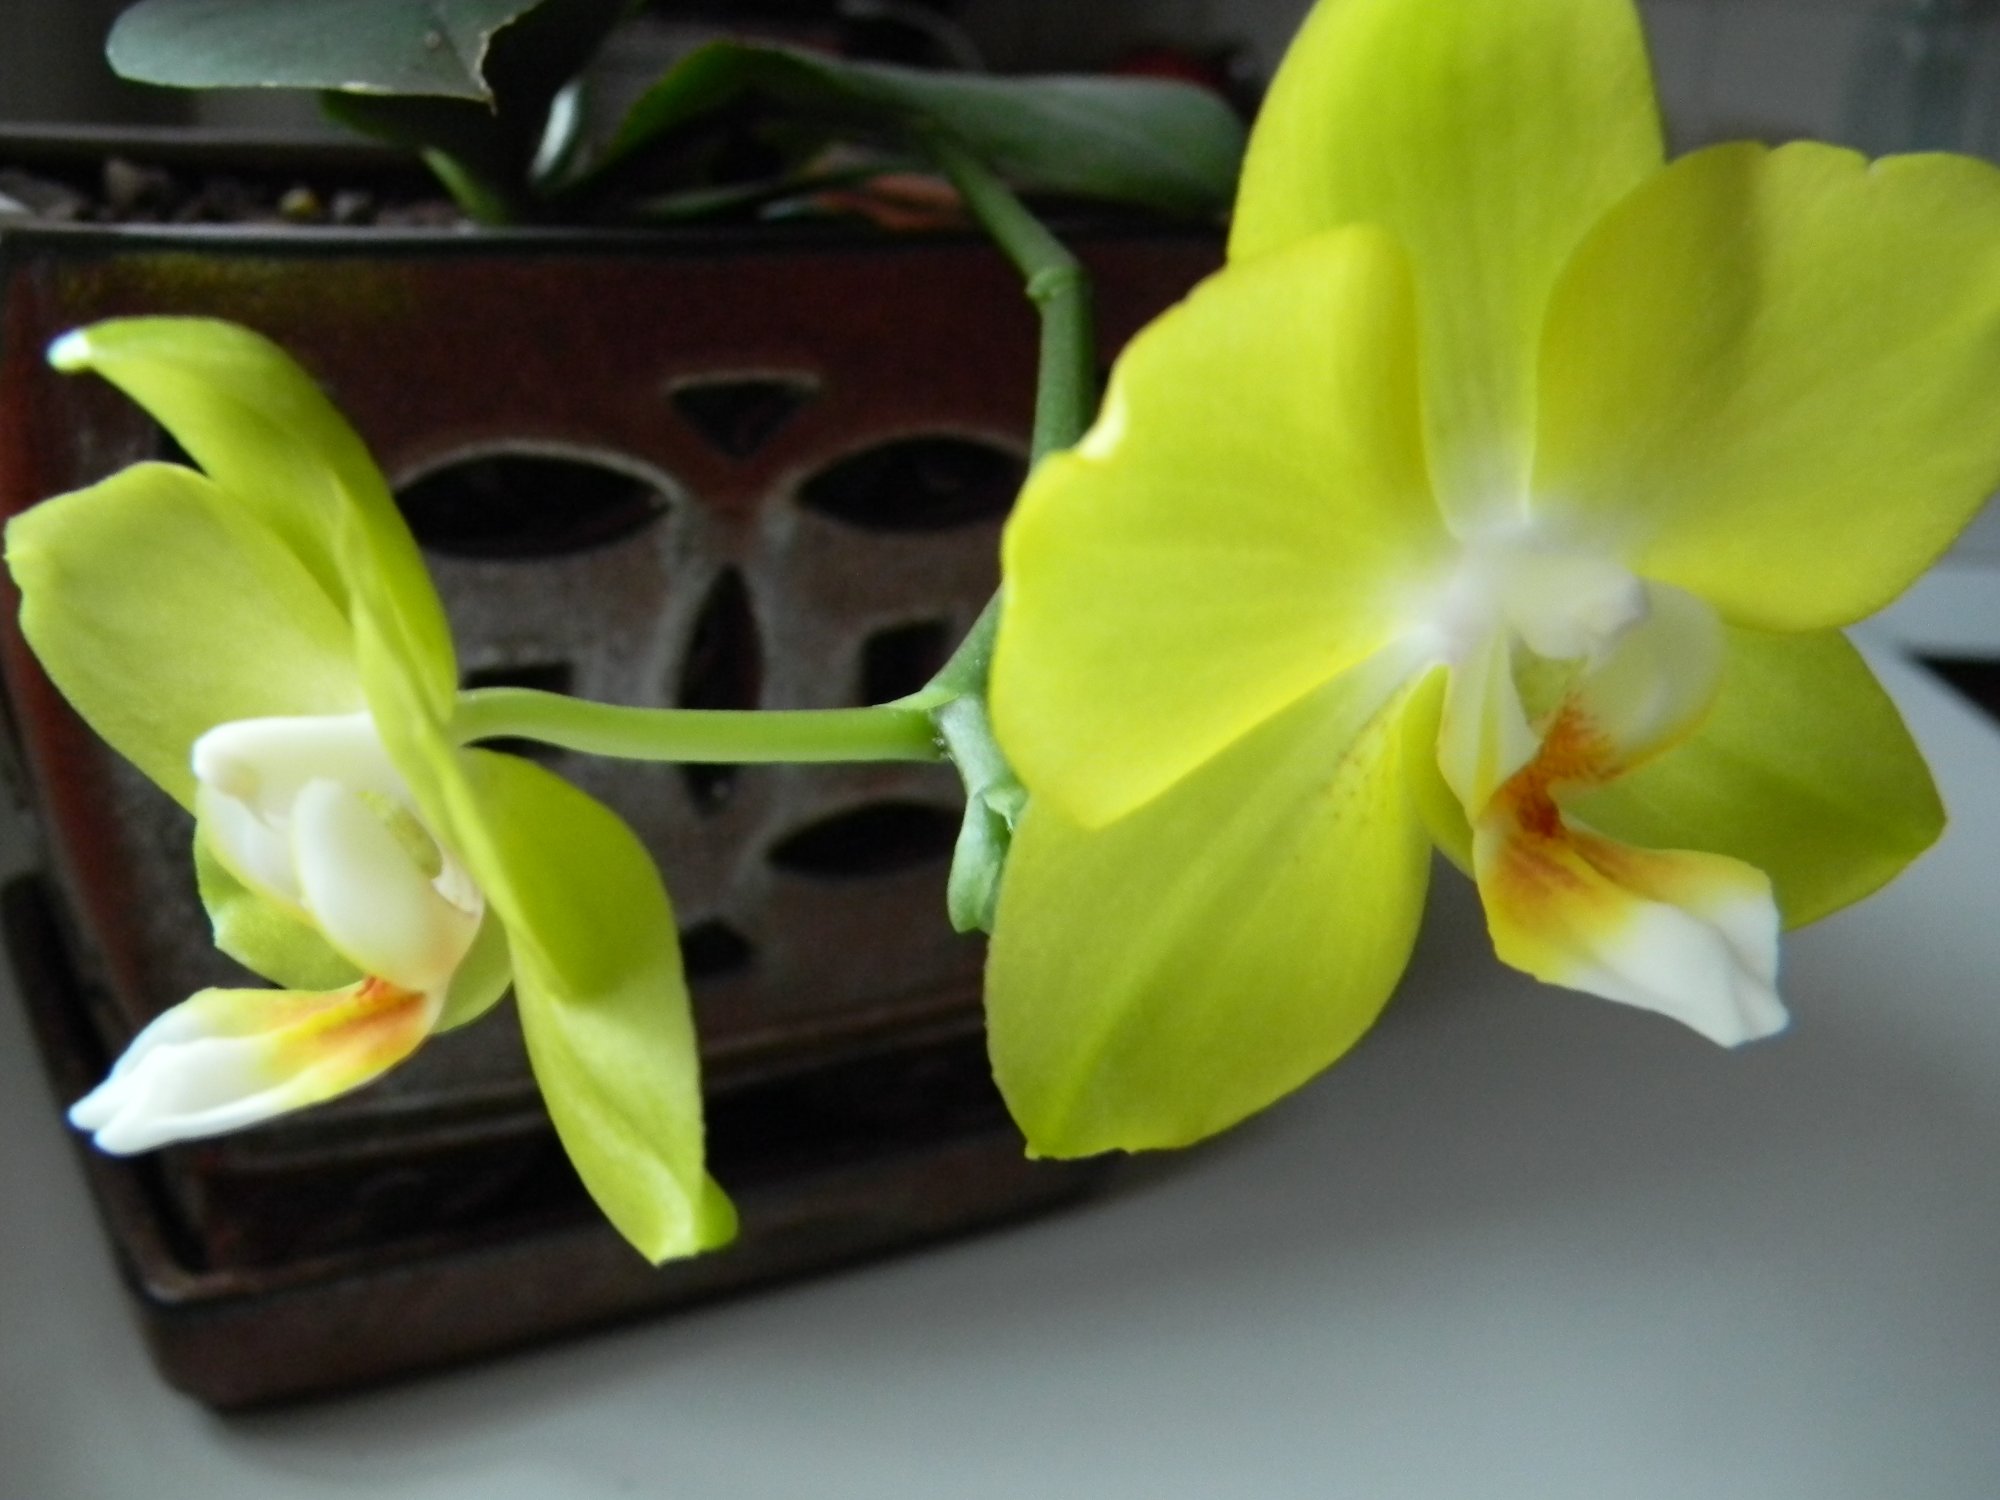
I’ve had this orchid for 3 years this May.  I remember this because my friend Nora brought me this plant when I was in the midst of thyroid cancer treatment.  I could not part with it.  I felt a bit of a spiritual connection to it.  The plant/leaves  looked healthy so if it could thrive, so could I.

Originally I think I was under watering.  I decided last spring/summer to put it on the deck thinking that if nothing happend I’d have to get rid of it.  Then  and unexpected rain absolutely drenched the plant.  It immediately flourished!  It sprouted new leaves and perked up as if to say, “ah, thank you!”

After I brought it in last fall, it began to sprout what looked to be a stem from the center.  I consistently watered twice a week and now,  flowers.  Whether cooking or caring for delicate house plants, all requires patience.

Love the rain we’ve been getting.  The narcissus have popped out of the ground, the butterfly bushes are sprouting leaves and many of our early flowering plants have leaves growing out of the base.  Yippee!

Of course, this all is food related.  Why you might ask?  As soon as our deck is chock-full of flowers, we begin entertaining.  Flowers and beautiful greenery are the perfect back drop for any outdoor celebration.

Ribs.  That’ll be the first thing I serve.  Maybe with an Asian twist?  I have a little time to ponder.

Have a blessed day!

Ang

Cheddar and Onion Whole Grain Biscuits…..

Umm.  One word.  Delicious.

Ok, maybe a couple more words.    These are made with real ingredients.  I use unbleached all purpose flour, whole wheat flour and wheat germ….and butter.   Can you imagine taking a bite of this right now????  They’re wonderful with honey too.   These go together in 10 minutes and bake for about 17.  Have some leftover?  Quick breakfast:  nuke the biscuit in the microwave for 15 seconds and top with a fried egg and cheese.  That’s what I’m talkin’ about!

Cheddar and Onion Whole Grain Biscuits

1 ¾ cups all purpose flour
½ cup whole wheat flour
¼ cup wheat germ
2 tablespoons sugar
4 teaspoons baking powder
1 teaspoons salt
½ cup cold butter, cut into ½” pieces
1 cup shredded sharp cheddar cheese
½ cup thinly sliced green onions (green part only)
½ cup plain non fat yogurt
½ cup milk
1 egg
1 tablespoon of milk

 1) Preheat oven to 375’. Foil line a cookie sheet, set aside.

2) In a large mixing bowl, combine the flour through the salt, whisk to blend.

3) Add the cubed butter pieces to the flour mixture. Use your hands to work the butter into the dry ingredients until there are no lumps of butter. The flour should resemble cornmeal.

4) Add the cheddar cheese and green onions, stir to blend. Make a well in the center.

5) Whisk the yogurt and milk together. Dump into the center of the flour mixture. Mix with a fork until the dry ingredients are moistened. Dump onto counter. Bring all ingredients together with your hands, knead a few times to make a dough. Dust the counter with a small amount of flour if the dough is too sticky.

6) Roll out the dough to ½” thickness. Using a 3” biscuit cutter, cut out as many biscuits as you can. Place them on the cookie sheet 1” apart. Put the scraps together trying to handle too much and cut out as many as you can. Pitch the scraps.

7) Beat the egg with the milk. Brush the tops of the biscuits with the egg wash. Bake for 14-17 minutes or until the biscuits are golden and set.   Makes 12-15 biscuits.  Serve with butter and honey. Yowza!

*Don’t have yogurt?  Substitute 1 cup of buttermilk, or 1 cup of milk with 1 teaspoon of vinegar.

Have a wonderful day!

Angie

St. Patrick’s Day Dinner Accompaniments….

Irish Soda Bread.  This soda bread is not of the dry variety.  This bread is moist, slightly sweet, and quite pleasing to the eye.  I make mini loaves as they take about half the baking time.   The shorter the baking time the less dried out it may become.  You can buy mini aluminum loaf pans at most any grocery store.  Serve alongside your traditional St. Patrick’s Day dinner.  If you have any leftovers, use it for french toast…OH  BOY!

Sauteed Cabbage.  I know this isn’t the traditional “boiled” cabbage but come on!  Who wouldn’t prefer delicious caramelized cabbage over boring boiled cabbage!  Trust me, you’ll LOVE this!  So simple.  Slice the cabbage into quarters and remove the core.  Thinly slice the entire head.    In a heavy large skillet over medium heat, melt 1 tablespoon of butter and add 2 tablespoons of olive oil.  Add the cabbage.  Season with kosher salt and pepper.  Cook for 40-50 minutes over medium-low heat, stirring often,  until the cabbage is caramelized. 

Homemade horseradish.  Wow!  If you like the sensation horseradish gives your sinuses, look out!  There is nothing like homemade horseradish to go with your corned beef and potatoes.  It’s quite simple.  Fresh horseradish root can be found in the produce section at most any grocery store.  Make your own cocktail sauce with one cup of ketchup, 1 tablespoon of brown sugar.  Add horseradish to taste.  So good!

I hope you have a wonderful St. Patrick’s Day!

Angie

Food Safety 101

     A year ago I took a food safety class and became certified in the safe handling of food.  Periodically, I will be sharing helpful hints and tidbits of information necessary to keep your loved ones safe.
     This isn’t the most pleasant subject, but it’s extremely important! Did you know that E.coli bacteria is in 25% of ground beef in the United States? E.coli is a surface bacteria that through grinding, incorporates the bacteria throughout the meat. The good news is that when cooked to the proper 155′ internal temperature, it does not survive.
     What does this mean? Number one NEVER serve ground beef rare or even pink to small children, pregnant women, older adults, or someone with a compromised immune system. There is a simple way to be sure you’ve cooked ground beef properly and that is an instant read thermometer. They run about $10 and can be found at Target or most any kitchen supply store.  Simply inject the thermometer in to the center part of the hamburger for 30-60 seconds and get a reading of 155′ or higher, and you’re good. When cooking steaks that are seared or grilled, you needn’t worry as the bacteria doesn’t survive the cooking on the surface.  It is ok to serve pink steak to children, etc.
     Additionally, be very careful when you are handling ANY raw meats. Designate a section on your counter for handling raw meats, and if possible, designate another section for vegetables and ready to eat items as they do not go through a cooking process to make them safe.
     Last but not least, wash your hands with hot water and plenty of soap for 20 seconds before, during, and after handling raw meats.
Thanks!
Angie

Baked Potato Skin Appetizers with Bacon and Cheese

Who doesn’t love potato skins?  Look to buy small potatoes.  They bake in about 45 minutes and are easy to manage when eating.  Make the skins and bacon ahead of time and bake right before you want to serve.  Save the leftover potato flesh for skillet potatoes

Start by baking 12 small potatoes at 375′ for 40-45 minutes.  

Cook the bacon until crispy.  Drain over paper towels and cut into small pieces.  Set aside.

Once the potatoes are done, cool until you can handle them.  Carefully scoop out the flesh of the potato.

Brush canola oil on the potato skins to coat.  Once they’re all coated with oil, season generously with kosher salt.   Bake in 375′ oven for 14-16 minutes.

The leftover potato flesh will be good for 7 days in the refrigerator.

Top the hot skins generously with cheese and cooked bacon.  Bake at 375′ another 5-7 minutes.  Serve with sour cream and sliced green onions.  Enjoy!

Potato Skin Appetizers
 12 small potatoes, baked, halved, and hollowed out
Kosher salt
3 tablespoons canola oil
½ lb. bacon cooked and cut into small pieces
8 ounces shredded sharp cheddar cheese
½ cup sour cream
½ cup thinly sliced green onions

1) Preheat oven to 375’. Bake potatoes for 35-40 minutes.

2) While the potatoes are baking, cook the bacon until crispy. Drain on paper towels and cut into small pieces. Set aside.

3) Remove potatoes from the oven and allow to cool until you can handle them. Cut in half and remove the flesh of the potato.  Save the flesh for breakfast potatoes.

4) Brush the inside and the back side with a thin layer of canola oil. Season the inside of the potato skin generously with kosher salt.  Place on a foil lined cookie sheet. Bake for 15 minutes.  Remove from oven and generously top with cheese and bacon. Bake an additional 8-10 minutes.

5) Remove from the oven and top each skin with a dollop of sour cream and a sprinkle of green onion. Serve immediately.   Makes 24.

Happy Birthday Deb!

Celebrated my sweet friend Deb’s 20th anniversary of her 21st birthday in Geneva, Illinois today.  Geneva is about 40 miles west of Chicago.   So fun!  Loved getting together with ten ladies to laugh over mimosas and enjoy a delicious celebratory meal in honor of our treasured friend.  One of the things I love about Deb is that she’s a great cook and  foodie.    I had no doubt that we’d have a yummy dining experience.  The restaurant was wonderful and worth the ride west. (good choice Kara!)

The name of the restaurant was Wildwood.  They serve a very nice a la carte  brunch on Sundays.   I would highly recommend this to anyone who might venture out that way for a day of fun and shopping.   

I had the Grand Marnier french toast….absolutely delicious.  Certainly a recipe I must try, I’m thinking very, very simple.  Might be delicious to make a baked french toast that sits in the refrigerator overnight and baked in the morning….yeah, that sounds really good!  The taste was exquisite.  Served alongside my tipsy french toast were four strips of delicious thick sliced apple-wood smoked bacon, lingonberry jam, maple syrup, and skillet roasted red skin potatoes.  Oh, and a bowl of fruit… can you say “food coma?” 

So.  Make a plan to go to Geneva with some girlfriends.  Have a mimosa or a bloody mary.  Order something you wouldn’t make at home. Enjoy.

Have a great week!

Angie

Skillet Potatoes….

Ever have leftover baked potatoes and don’t know what to do with them?  Well, this is the most delicious solution I can think of!   The next time you make baked potatoes, make a few extra.  (ALWAYS refrigerate leftover potatoes!)  Simply remove the skins and coarsely slice them up.  Enjoy as a side dish to most any roasted or grilled meats or make your own breakfast skillet.

Skillet Potatoes

2-3 large baking potatoes, skin removed and sliced

2-3 tablespoons canola oil

1/2 small onion, thinly sliced

Salt and pepper to taste

Garnish with green onions

1)  Heat non stick or cast iron skillet over medium heat until very hot.  Add the oil and the onion,  cook until soft, about 5 minutes.  Add potatoes.  Resist the temptation to stir often.  You want to let them sit in the pan long enough to get brown before turning.  Use a large spatula to give them a flip.  Cook until they get nicely browned.  Season to taste with salt and pepper.  Garnish with sliced green onions.

*Add peppers and mushrooms if you like.

Natchitoches (Nack-uh-Tush) With Spicy Yogurt Dipping Sauce

I came across this little stuffed meat appetizer pie in a Food and Wine Cookbook,  Best of 2010.  I made a couple of small changes.  I didn’t care for the crust, it was a bit tough.  I used my own pie crust recipe-worked like a charm.  I did, however, love the idea for a spicy tart dip.  The recipe suggested using buttermilk, but I always have plain yogurt on hand, so I made my version of it.

The name really piqued my curiosity so I googled.  Turns out these meat pies were popular in the late 1700’s in the small Louisiana town that shares the name.    It is said that the meat pies were easy for working men to transport to work and were easy to eat.  I LOVE food history! 

I enjoyed making these little appetizers but they were time consuming.  I think it would make an interesting dinner (make them larger) and I think kids would dig it.  (maybe cut back on some of the spice)  I’d serve a nice green salad with a vinaigrette.  The sharp vinegar cuts the richness of the meat filling. 

Brown the meat in a little olive oil.  Add minced garlic, green pepper, and onion.  Cook until vegetables are soft.  Add tomato paste, cayenne pepper, ground cloves, dried thyme, ground coriander, allspice, sugar, and water.  Add a couple of pinches of salt and a couple of dashes of Tabasco.  Allow to cool completely. (be sure to do this, the crust dough will not fare well with warm filling)  Prepare the egg wash and preheat the oven to 350′.

Roll out a pie crust disc into a 12-14″ circle.  Using a 4″ biscuit cutter, cut out as many circles as possible.  Working one at a time, brush half of the circle’s edge with the egg wash.

Add a tablespoon of the cooled meat mixture to one side of the circle.

Fold the circle over the meat and seal the edges.

Crimp the edges with a fork and poke the center of the pastry with the fork to vent steam.  Place on parchment lined cookie sheet.

Brush the tops with the egg wash.  Bake for 25 minutes.  While they’re baking, prepare the dipping sauce.  Enjoy!

Natchitoches Meat Pies with Spicy Yogurt Dip

Dough:

My pie crust recipe, doubled and chilled for 30-40 minutes

 Filling:

 1 tablespoon olive oil

½ lb. lean ground beef

1 large clove garlic, minced

½ cup onion, finely diced

1 small green pepper, seeded and finely diced

1 bay leaf

1 tablespoon tomato paste

2 teaspoons sugar

¼ teaspoon ground cloves

1/8 teaspoon cayenne pepper

1/8 teaspoon dried thyme

1/8 teaspoon ground coriander

1/8 teaspoon ground allspice

2 tablespoons water

2 pinches salt

Two shakes of Tobasco

1 egg beaten with 2 tablespoons of milk

Yogurt Dip

 2 tablespoons mayonnaise

2 tablespoons sour cream

½ cup non fat greek yogurt

1 teaspoon ground celery seeds (or ½ teaspoon celery salt)

Two shakes hot sauce

1)  Prepare crust and wrap discs in plastic wrap.  Refrigerate for 30-40 minutes.

2)  Heat a large skillet over medium heat and add olive oil.  Add meat and cook until no longer pink, about 5 minutes.  Add the garlic, onion, bell pepper, and bay leaf.  Cook 7-9 minutes until veggies are soft.

3)  Stir in tomato paste through water.  Cook for 3-5 minutes.  Discard the bay leaf and allow the mixture to cool.

4)  Preheat the oven to 350’.  Line a large cookie sheet with parchment paper, set aside.

5)  Roll out the pie crust to a 14” round.  Using a 4” biscuit cutter, cut out as many circles as you can.  Brush the edge of half of the round with the egg wash, add a tablespoon of cooled meat mixture to one side of the circle.  Fold over, press to seal.  Using a fork, crimp the edges and poke the center of the tart to vent.  Place on cookie sheet.  Brush with the egg wash.  Bake for 25 minutes or until golden brown.

6)  In a small bowl, whisk all ingredients until well blended.  If sauce is too thick, thin out with a little milk.

 *Make a day or two ahead and warm in 350’ oven for 10 minutes.  Whisk the sauce and serve.

Semiramis…Best Lebanese Food Ever!

Going to Semiramis with my friend Sarah tonight! It’s BYOB, love that. Best hummus I’ve ever had!!! Be ready for Lebanese inspired recipes soon!

http://www.semiramisrestaurant.com/

Have a great evening!

Angie

PS-in case you’re wondering….I’m bringing Prosecco:-)

Three Cheese Stuffed Jalapeno Peppers….

This is the perfect combination of sweet and spicy.  Like most people, I love fried foods but avoid them.  Try these, you will not know the difference!  Remove the seeds and membrane and you should eliminate most of the heat.  Leave a bit in if you want a little more “kick.”  The sauce is super simple, raspberry preserves cut with a little rice wine vineagar…YUM!

Oven Fried Three Cheese Stuffed Jalapeño Peppers

18 jalapeno peppers, blanched, halved, and seeded

Kosher salt

8 oz. cream cheese, softened

1 ½ cups shredded extra sharp cheddar cheese

4 ounces goat cheese

¼ cup piquillo peppers, minced or any sweet red pepper

2 teaspoons Worcestershire sauce

2 eggs, beaten

1 tablespoon water

2 cups panko bread crumbs(Japanese Bread Crumbs)

Sweet and sour sauce

1 cup raspberry preserves

1 tablespoon rice wine vinegar

1)  Bring a large pot of water to boil over high heat.  Add 1 teaspoon salt.  Once boiling, add whole peppers to pot and boil for 2 minutes.  Drain and immediately place peppers into a bowl of ice water.

2)  Preheat oven to 400’.  Non stick foil line a cookie sheet and evenly coat with 2 teaspoons of olive oil.  Set aside.

3)  Once peppers are cool, cut in half and carefully remove the seeds and membrane.  I highly recommend wearing gloves.  Season pepper halves generously with salt.

4)  In a medium size mixing bowl, beat the goat cheese, cream cheese and Worcestershire sauce.  Add the cheddar and the minced piquillo peppers.

5)  Stuff each pepper with cheese.  Dip into beaten egg and then into panko crumbs, coat well.  Place on prepared cookie sheet and drizzle with olive oil.  Bake for 15 minutes.  While the peppers are baking, whisk the raspberry preserves and rice wine vinegar together.  Serve stuffed peppers with sauce.

*can be made a day ahead, refrigerated, then baked.